Dell S6000 Dell Networking Installation Guide - Page 30
To install an AC or DC power supply, follow these steps, PSU1 as the blank plate slot.
 |
View all Dell S6000 manuals
Add to My Manuals
Save this manual to your list of manuals |
Page 30 highlights
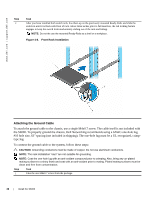
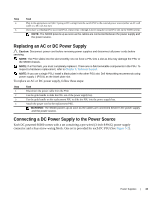
www.dell.com | support.dell.com NOTE: S6000 ships with two PSUs. However, it is possible to run the unit with a single PSU. If you use a single PSU, install a blank plate in the other PSU slot. Dell Networking recommends using power supply 1 (PSU1) as the blank plate slot. To install an AC or DC power supply, follow these steps: Step Task 1 Remove the PSU slot cover from the S6000 (PSU side of switch), either of the two PSU slots may be selected. 2 Remove the PSU from the electrostatic bag. 3 Insert the PSU into the switch PSU slot (insert the PSU-exposed PCB edge connector first). The PSU slot is keyed such that the PSU can only be fully inserted in one orientation. 1 - Slot 1 2 - PSU 1 When you install the PSU correctly it should snap into place and be flush with the back of the switch. 4 Plug in the appropriate cord (AC 3 prong or DC wiring) from the switch PSU to the external power source (either AC wall outlet or DC rack bus bar). 5 If you have a redundant PSU (2nd PSU), repeat steps 1 through 5 above using the 2nd PSU slot on the S6000 system. NOTE: The system powers up as soon as the cables are connected between the power supply and the power source. 30 | Install the S6000
-
 1
1 -
2
-
3
-
4
-
5
-
6
-
7
-
8
-
9
-
10
-
11
-
12
-
13
-
14
-
15
-
16
-
17
-
18
-
19
-
20
-
21
-
22
-
23
-
24
-
 25
25 -
 26
26 -
 27
27 -
 28
28 -
 29
29 -
 30
30 -
 31
31 -
 32
32 -
 33
33 -
 34
34 -
 35
35 -
36
-
37
-
38
-
39
-
40
-
41
-
42
-
43
-
44
-
45
-
46
-
47
-
48
-
49
-
50
-
51
-
52
-
53
-
54
-
55
-
56
 |
 |
