Dell Vostro 1710 Service Manual - Page 34
Wireless Local Area Network WLAN Card - wireless card
 |
View all Dell Vostro 1710 manuals
Add to My Manuals
Save this manual to your list of manuals |
Page 34 highlights
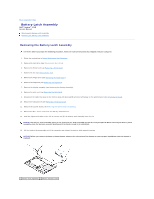
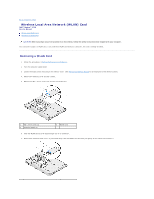
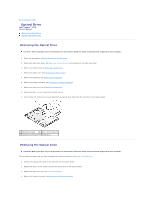
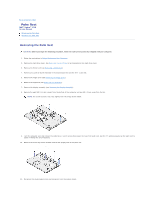
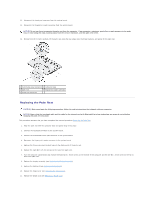
Back to Contents Page Wireless Local Area Network (WLAN) Card Dell™ Vostro™ 1710 Service Manual Removing a WLAN Card Replacing a WLAN Card CAUTION: Before you begin any of the procedures in this section, follow the safety instructions that shipped with your computer. Your computer supports a WLAN card. If you ordered a WLAN card with your computer, the card is already installed. Removing a WLAN Card 1. Follow the procedures in Before Working on Your Computer. 2. Turn the computer upside down. 3. Loosen the eight screws that secure the memory cover. (See Removing a Memory Module for an illustration of the memory cover.) 4. Remove the memory cover and set it aside. 5. Remove the M2 x 3-mm screw that secures the WLAN card. 1 M2 x 3-mm screw (1) 3 antenna cables (2) 2 WLAN card 6. Slide the WLAN card at a 45-degree angle out of its connector. 7. Rotate each antenna cable until it is positioned away from the WLAN card and then pull gently on the cable to disconnect it.
-
 1
1 -
2
-
3
-
4
-
5
-
6
-
7
-
8
-
9
-
10
-
11
-
12
-
13
-
14
-
15
-
16
-
17
-
18
-
19
-
20
-
21
-
22
-
23
-
24
-
25
-
26
-
27
-
28
-
 29
29 -
 30
30 -
 31
31 -
 32
32 -
 33
33 -
 34
34 -
 35
35 -
 36
36 -
 37
37 -
 38
38 -
 39
39 -
40
-
41
-
42
-
43
-
44
-
45
-
46
-
47
-
48
-
49
-
50
-
51
-
52
-
53
-
54
-
55
-
56
-
57
-
58
 |
 |