Dell W-7200 PowerConnect Series Controller Installation Guide - Page 16
Fan Tray, Hot Swapping, Table 14
 |
View all Dell W-7200 manuals
Add to My Manuals
Save this manual to your list of manuals |
Page 16 highlights
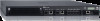
Fan Tray CAUTION: The W-7200 controller is equipped with a field-replaceable, hot-swappable fan tray. Each fan tray features four individual fans that pull air through the chassis from the front through to the rear. Each fan tray can tolerate the failure of a single fan while maintaining a safe operating temperature for the controller CAUTION: The W-7200 controller is not compatible with fan trays from other Dell hardware platforms. Hot Swapping Hot swapping allows you to replace a failed fan tray, making it unnecessary to shut down the W-7200 controller during the replacement procedure. Figure 7 Fan Tray 2 1 3 Table 14 Fan Tray Components Callout Component 1 Left Latch 2 Right Latch 3 Handle Description Used to secure the left side of the fan tray to the chassis. Used to secure the right side of the fan tray to the chassis. Used to insert and remove the fan tray from the chassis. Figure 8 shows the airflow pattern for the W-7200 controller. The blue arrows show cool air being pulled into the device and the red arrows show warm air being forced out by the fan tray module. When installing your W-7200 controller, ensure that you leave sufficient space around the device for proper airflow. 16 | Dell PowerConnect W-7200 Controller Dell PowerConnect W-7200 Series Controller | Installation Guide
-
 1
1 -
2
-
3
-
4
-
5
-
6
-
7
-
8
-
9
-
10
-
 11
11 -
 12
12 -
 13
13 -
 14
14 -
 15
15 -
 16
16 -
 17
17 -
 18
18 -
 19
19 -
 20
20 -
 21
21 -
22
-
23
-
24
-
25
-
26
-
27
-
28
-
29
-
30
-
31
-
32
 |
 |
