Dell Z9264F-ON EMC PowerSwitch Installation Guide March 2022 - Page 18
Z9264F-ON switch installation, Ground lug assembly
 |
View all Dell Z9264F-ON manuals
Add to My Manuals
Save this manual to your list of manuals |
Page 18 highlights
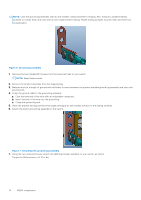
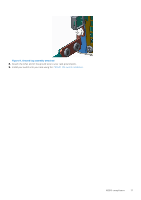
5 Z9264F-ON switch installation To install the Z9264F-ON switch, complete the installation procedures in the order presented in this chapter. Always handle the switch and components with care. Avoid dropping the switch or its field replaceable units (FRUs). NOTE: ESD damage can occur if components are mishandled. Always wear an ESD-preventive wrist or heel ground strap when handling the Z9264F-ON switch and components. As with all electrical devices of this type, take all the necessary safety precautions to prevent injury when installing this switch. Topics: • Ground lug assembly • Four-post rack assembly • Four-post rack mount • 2RU front-rack installation • Optics installation • Switch start-up • After switch placement • Switch replacement Ground lug assembly Before you install the switch into a rack, install the ground (GND) lug assembly. NOTE: For AC-powered switches, although the third conductor of the AC power cable provides a ground path, Dell Technologies recommends grounding your switch with a dedicated ground wire. You can order an AC ground lug separately. NOTE: For a DC-powered switch, the only way to safely ground your switch is to attach a dedicated ground wire. The ground lug kit ships in a plastic bag that is placed with the other accessories inside the shipping box. The ground lug bracket screws ship attached to the switch. Before you install the DC switch in the dual-tray, attach the ground lug and bracket to the switch using the included screws and then attach the DC ground wire to the ground lug. The switch includes two installed M4 screws on the lower-left side of your switch. The DC switch also includes an assembled UL-certified GND lug with bracket, which is packaged separately. The AC switch does not include the UL-certified GND lug. If any parts are missing, contact your Dell EMC sales representative. The ground cable is not included. To properly ground the switch, Dell Technologies recommends a one- or two-hole lug, M4 hole size. The grounding lugs must be a UL-recognized, crimp-type lug. CAUTION: Grounding conductors must be made of copper. Do not use aluminum conductors. NOTE: Coat the ground lug assembly with an antioxidant compound before crimping. Also, bring any unplated mating surfaces to a clean finish and coat with an antioxidant before mating. Plated mating surfaces must be clean and free from contamination. 1. Remove the two installed M4 screws from the lower-left side of your switch. NOTE: Keep these screws. 2. Remove the bracket assembly from the shipping bag. 18 Z9264F-ON switch installation
-
 1
1 -
2
-
3
-
4
-
5
-
6
-
7
-
8
-
9
-
10
-
11
-
12
-
 13
13 -
 14
14 -
 15
15 -
 16
16 -
 17
17 -
 18
18 -
 19
19 -
 20
20 -
 21
21 -
 22
22 -
 23
23 -
24
-
25
-
26
-
27
-
28
-
29
-
30
-
31
-
32
-
33
-
34
-
35
-
36
-
37
-
38
-
39
-
40
-
41
-
42
 |
 |
