Dell Z9264F-ON EMC PowerSwitch Installation Guide March 2022 - Page 22
RU front-rack installation
 |
View all Dell Z9264F-ON manuals
Add to My Manuals
Save this manual to your list of manuals |
Page 22 highlights
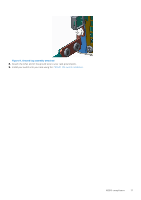
1. Align the system with the rails, and slide the system into the rack. 2. Tighten the screws on each side of the front panel, items 1 and 2. To remove the system from the rack, loosen the screws and slide the system out of the rack. Figure 13. Z9264F-ON installation 1. Extra screws to restrict front-back movement of the switch. 2. Main screw 2RU front-rack installation Configure the rails that are attached to the switch. NOTE: For more instructions, see the installation instruction labels on the rail. 1. Attach the inner switch rails to the Z9264F-ON switch. Line up the rail with the mounting heads and attach the rail to the switch. Slide the rail back until it locks into place. 2. Line up both switch rails to the previously mounted rack rails and slide the switch in until it is flush with front of rack. To keep the switch from inadvertently sliding out of the rack and falling, about 3 inches before you fully insert your switch, the rail locking feature engages. 22 Z9264F-ON switch installation
-
 1
1 -
2
-
3
-
4
-
5
-
6
-
7
-
8
-
9
-
10
-
11
-
12
-
13
-
14
-
15
-
16
-
 17
17 -
 18
18 -
 19
19 -
 20
20 -
 21
21 -
 22
22 -
 23
23 -
 24
24 -
 25
25 -
 26
26 -
 27
27 -
28
-
29
-
30
-
31
-
32
-
33
-
34
-
35
-
36
-
37
-
38
-
39
-
40
-
41
-
42
 |
 |
