Denon AVR-2311 Owners Manual - English - Page 51
Preset Name, Input Assign
 |
View all Denon AVR-2311 manuals
Add to My Manuals
Save this manual to your list of manuals |
Page 51 highlights
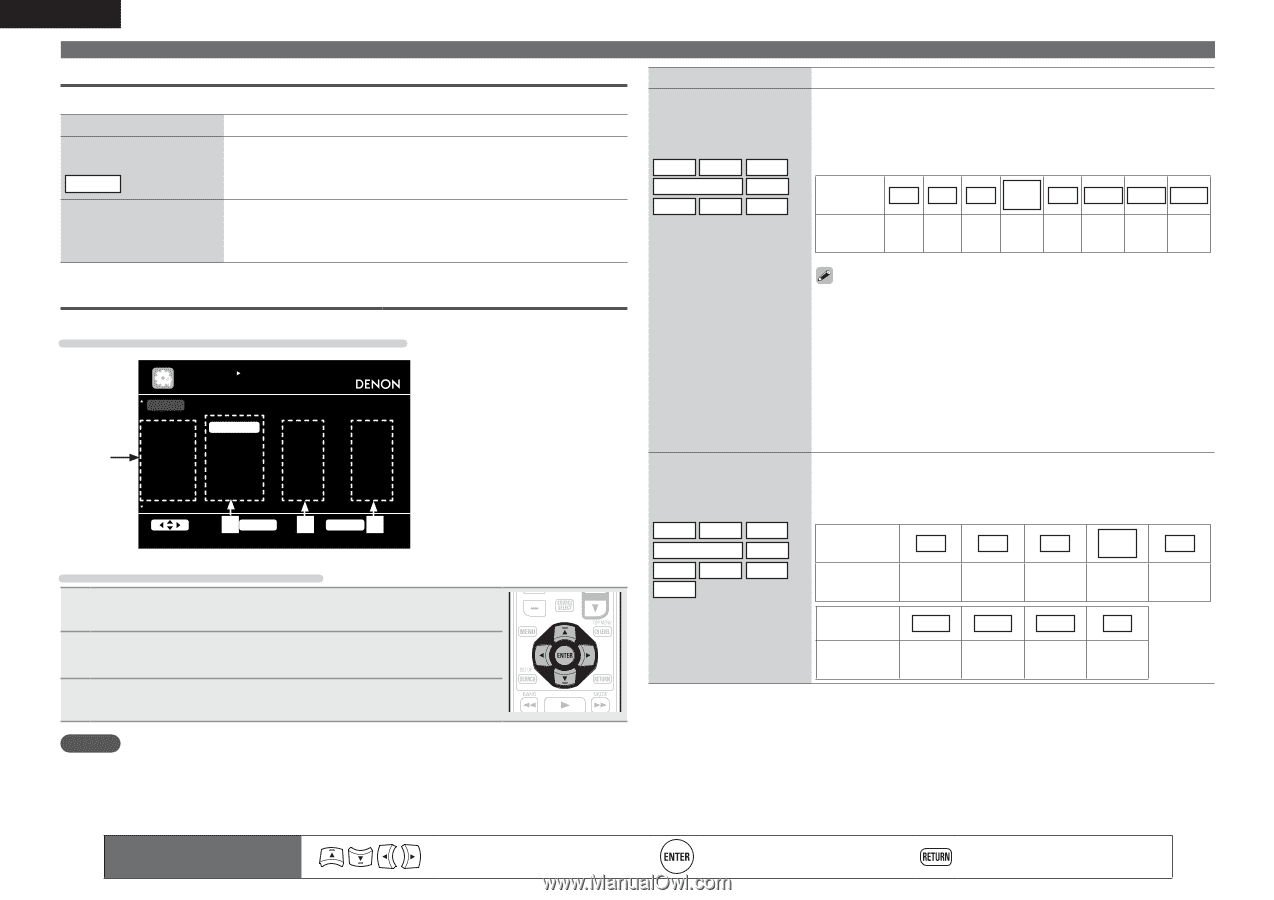
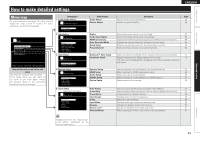
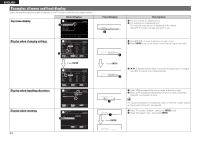
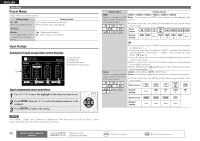
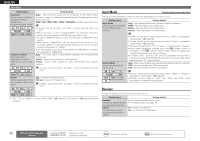
ENGLISH Input Setup Preset Name Assign name to a preset memory. Setting items A1 - G8 Select the preset channel. Setting details • Up to eight characters can be input. • For character input, see page 45. HD Radio Default The changed preset name is returned to the default setting. Yes : Reset to the defaults. No : Do not reset to the defaults. Setting items Setting details HDMI HDMI 1 / HDMI 2 / HDMI 3 / HDMI 4 / HDMI 5 / HDMI 6 Set this to change the HDMI None : Do not assign an HDMI input connector to the selected input input connectors assigned source. to the input sources. • At time of purchase, the settings of the different input sources are as BD DVD TV shown below. SAT/CBL DVR GAME V.AUX DOCK Input source BD DVD TV SAT/ CBL DVR GAME V.AUX DOCK Default setting HDMI HDMI 1 2 None HDMI HDMI HDMI HDMI 3 4 5 6 None Input Assign Examples of input assign menu screen displays INPUT SETUP INPUT ASSIGN q Input Source w HDMI input Default [ HDMI ] [ DIGITAL ] [ COMP ] e Digital audio input r Component video input BD HDMI1 None None DVD HDMI2 Coax1 1-RCA q TV SAT/CBL None HDMI3 Opt1 Coax2 None 2-RCA DVR HDMI4 Opt2 None GAME HDMI5 None None V.AUX HDMI6 None None w e r Select ENTER Enter RETURN Return Change HDMI input connector assignment Input assignments menu operations 1 Use uio p to move the highlight to the item you want to set. 2 Press ENTER, then use o p to select the input connector to be assigned. 3 Press ENTER to register the setting. • An input source to which an HDMI input connector cannot be assigned is displayed as "- - -". • To play the video signal assigned at "HDMI" combined with the audio signal assigned at "Input Assign" - "Digital", select "Digital" at "Input Mode" (vpage 50). • The audio signals input from the analog and digital connectors are not output to the monitor. • When a control dock for iPod is connected, signals cannot be assigned to the HDMI connectors. • When "HDMI Control" (vpage 60) is set to "ON", HDMI input connector cannot be assigned to "TV". Digital COAX1 - 2 (COAXIAL) / OPT1 - 2 (OPTICAL) Set this to change the digital None : Do not assign a digital input connector to the selected input source. input connectors assigned to the input sources. • At time of purchase, the settings of the different input sources are as shown below. BD DVD TV SAT/CBL DVR Input source BD DVD TV SAT/ CBL DVR GAME V.AUX DOCK CD Default setting None COAX 1 OPT 1 COAX 2 OPT 2 Input source GAME V.AUX DOCK CD Default setting None None None None NOTE If all "HDMI", "Digital" and "Component" assignment of the Game source are set to "None", Game source cannot be selected with the input source selection. 48 Remote control operation buttons Move the cursor (Up/Down/Left/Right) Confirm the setting Return to previous menu
-
 1
1 -
2
-
3
-
4
-
5
-
6
-
7
-
8
-
9
-
10
-
11
-
12
-
13
-
14
-
15
-
16
-
17
-
18
-
19
-
20
-
21
-
22
-
23
-
24
-
25
-
26
-
27
-
28
-
29
-
30
-
31
-
32
-
33
-
34
-
35
-
36
-
37
-
38
-
39
-
40
-
41
-
42
-
43
-
44
-
45
-
 46
46 -
 47
47 -
 48
48 -
 49
49 -
 50
50 -
 51
51 -
 52
52 -
 53
53 -
 54
54 -
 55
55 -
 56
56 -
57
-
58
-
59
-
60
-
61
-
62
-
63
-
64
-
65
-
66
-
67
-
68
-
69
-
70
-
71
-
72
-
73
-
74
-
75
-
76
-
77
-
78
-
79
-
80
-
81
-
82
-
83
-
84
-
85
-
86
-
87
-
88
-
89
-
90
 |
 |