Denon DN-HC4500 Operating Instructions - Page 12
Preset - user manual
 |
UPC - 081757508070
View all Denon DN-HC4500 manuals
Add to My Manuals
Save this manual to your list of manuals |
Page 12 highlights
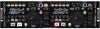
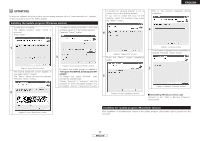
ENGLISH 7 TRIM For instructions on the trim function, refer to the manual of the DN-D4000/D4500/BU4500. NOTE: If the setting made at the "CD Mode Sel" presetting does not correspond to what is actually connected, the unit may not operate properly. 8 PRESET • This function is only valid when the "PC" source is selected. (When the DN-D4000/D4500/BU4500 is connected, the corresponding preset operation is performed.) • The DN-HC4500 is equipped with a preset function allowing users to store and recall the devices' operation modes. The function includes the items and values described below. 1. Preset mode q Press and hold in the PRESET button for at least 1 second to enter the preset mode. w Use the PARAMETERS knob to select the preset item. e Select the item and press the PARAMETERS knob to set the preset item to be changed. r Next, turn the PARAMETERS knob. The preset data is selected. t Select the data and press the PARAMETERS knob to set the preset data to be changed. y To make multiple presettings, repeat steps w ~ t. u The preset mode is turned off when the PRESET button is pressed. 2. Preset items and data The "*" mark next to the data indicates the default value. (1) USB Mode Sel: HC4500 MIDI* Selects the USB communications mode. The DN-HC4500 uses unique MIDI specifications. (2) CD Model Sel: DN-D4500* / DN-D4000 Select the name of the model to be connected to the DRIVE terminal and controlled. The BU4500 is the same as the DN-D4500's drive, so the PRESET setting is "DN-D4500". (3) Audio Fs Sel: 44.1k* / 48k / 96k / Auto 44.1 kHz: The sampling frequency (Fs) is fixed at 44.1 kHz, regardless of the data sent from the PC. 48 kHz: The sampling frequency (Fs) is fixed at 48 kHz, regardless of the data sent from the PC. 96 kHz: The sampling frequency (Fs) is fixed at 96 kHz, regardless of the data sent from the PC. AUTO: The sampling frequency (Fs) switches automatically according to the data sent from the PC. q To set "Fs", press PARAMETERS. "OK to CHANGE?Ø" is displayed on the character display. w Push the PARAMETERS knob again. e After the sampling frequency is changed, "Audio Fs Sel" is displayed. (4) Unit No. Set: 1 to 15 / ALL* Sets the device's unit number. For example, when two devices are connected to a PC, set one device to "No. 2" or the like. (5) MIDI CH Set: 1&2* / 3&4 / 5&6 Sets the MIDI channel. (6) JOG Pulse Sel: 1480* / 740 / 555 / 370 count/cycle Selects the number of pulses output per one revolution of the jog wheel. (7) FaderIn Mode: 1-PLAY/CUE / 2-PLAY / CUE (8) X-CONT XFD: OFF / ON* Sets whether to enable or disable X-control input signal cross fader input. (9) Preset Init.: Set all the preset data back to the factory defaults. q To clear the PRESET data, push the PARAMETERS knob. "Preset Init" flashes on the character display. w Push the PARAMETERS knob again. "Push to ExeØ" is displayed on the character display. e Push the PARAMETERS knob again. "OK to CHANGE?Ø" is displayed on the character display. r Once clearing is completed, "Completed!" is displayed. 8 ENGLISH
-
 1
1 -
2
-
3
-
4
-
5
-
6
-
 7
7 -
 8
8 -
 9
9 -
 10
10 -
 11
11 -
 12
12 -
 13
13 -
 14
14 -
 15
15 -
 16
16 -
 17
17 -
18
-
19
-
20
-
21
-
22
-
23
-
24
-
25
 |
 |
