Denon DN-HC4500 Operating Instructions - Page 13
ASIO CONTROL PANEL Windows version only - driver
 |
UPC - 081757508070
View all Denon DN-HC4500 manuals
Add to My Manuals
Save this manual to your list of manuals |
Page 13 highlights
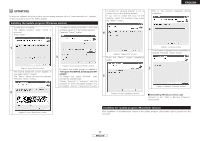
ENGLISH 9 ASIO CONTROL PANEL (Windows version only) Installing the ASIO driver Double-click the installer. The ASIO Driver Setup Wizard is launched. Press "Next>". A screen for verifying the folder in which the ASIO driver is to be installed appears. Press the "Next>" button. A window for verifying whether or not to create icons on the desktop appears. If you want to create the icons on the desktop, check the checkbox, then press the "Next>" button. This is the window displayed during installation. 6 4 1 3 Diagram: ASIO Driver Setup Wizard window The license agreement screen appears. If you agree, select "I Agree". The "Next>" button can now be selected. Press the "Next>" button. 2 Diagram: Select Installation Folder window By default, the ASIO driver is installed in "C\Program Files\DENON_DJ\DDJASIO\". To change this, select "Browse", then choose the desired folder. Choose "Everyone" if "everyone" uses the computer on which the update program is to be installed, "Just me" if you are the only user. Diagram: License Agreement window Diagram: Create Icons window Press the "Next>" button. Installation begins. Diagram: Installing window This window is displayed when installation is finished. Press the "Close" button. 7 5 Diagram: Confirm Installation window Diagram: Installation Complete window 2 Uninstalling Uninstall at the "Add or Remove Programs" control panel. 9 ENGLISH
-
 1
1 -
2
-
3
-
4
-
5
-
6
-
7
-
 8
8 -
 9
9 -
 10
10 -
 11
11 -
 12
12 -
 13
13 -
 14
14 -
 15
15 -
 16
16 -
 17
17 -
 18
18 -
19
-
20
-
21
-
22
-
23
-
24
-
25
 |
 |
