Denon DN-HC4500 Operating Instructions - Page 9
Device Change - usb midi
 |
UPC - 081757508070
View all Denon DN-HC4500 manuals
Add to My Manuals
Save this manual to your list of manuals |
Page 9 highlights
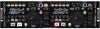
ENGLISH (3) Display !6 !5 !4 !3 !2 !1 !0 q w e r tyu i o !4 Time mode indicators • The display switches as follows when the Time button is pressed: ELAPSED: The elapsed playing time from the beginning of the track is displayed. REMAIN: The track's remaining time is displayed. T.ELAPSED: The playing time from the first track on the disc is displayed. T.REMAIN: The remaining time of all the tracks on the disc is displayed. !5 Track indicator • This indicates the number of the currently playing track. !6 Connection indicators • These indicate the connected devices controlled by the DN-HC4500. PC: The DN-HC4500 is controlling the DJ software on a PC/MAC. CD: The DN-HC4500 is controlling a DN-D4000/ D4500/BU4500. ✽ Playback of the USB audio signals from a PC continues while in the CD mode. q Play Position indicators • The white position indicator lights during normal playback, and the position in the track is indicated by the elapsed time. • If the time to the end of the track is shorter than the specified time, the playback position indicator flashes according to the track's remaining time (EOM) to indicate the end of the track. w Loop mode indicators • The DN-HC4500 has two loop mode indicators, A and B. The A and B indicators light when A and B are set. e Character display • This block displays various operational information, text message, etc. r File data indicators • These indicate the type of file being played. t External device connection confirmation indicator • This lights when MIDI signals have been sent or received between the DN-HC4500 and an external device. y Keyboard indicator • This lights when the light command is received from a computer. u KEY ADJ. indicator • "KEY ADJ." lights when in the key adjust mode. i Visual Marker • The playback position is indicated according to the playback status of the different decks. o MEMO indicator • The "MEMO" indicator lights when there is memo data stored for the track that is currently playing or set to standby. !0 Pitch indicator • This indicates the playing speed (pitch). !1 BPM indicator • This lights when the BPM is displayed in the pitch display section. !2 Play mode indicators • These indicate the play mode. CONT.: Once playback of a track finishes, the next track is played. SINGLE: Playback stops once the end of that track is reached. !3 Minute, second and frame displays • This indicates the position currently playing or at which the standby mode is set. 4 DEVICE CHANGE Press the SOURCE button to display the "SOURCE" selection screen. Note: 1 • When the BACK button is pressed, source switching is completed and the mode returns to the normal model. Turn the PARAMETERS knob to select the device. Press the knob again to enter. "OK to CHANGE" is displayed. Note: 2 • The mode switches to "NO" when the PARAMETERS knob is turned while "OK to CHANGE?Ø" is displayed. • When in the "NO" mode, press the PARAMETERS knob or BACK button to return to step 1. Press the knob again to enter. "Completed!" is displayed and source 3 switching is completed. 5 ENGLISH
-
 1
1 -
2
-
3
-
 4
4 -
 5
5 -
 6
6 -
 7
7 -
 8
8 -
 9
9 -
 10
10 -
 11
11 -
 12
12 -
 13
13 -
 14
14 -
15
-
16
-
17
-
18
-
19
-
20
-
21
-
22
-
23
-
24
-
25
 |
 |
