Denon DNC615 Operating Instructions - Page 6
English, 1. Features, 2. Part Names And Functions - remote
 |
View all Denon DNC615 manuals
Add to My Manuals
Save this manual to your list of manuals |
Page 6 highlights
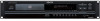
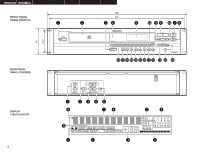
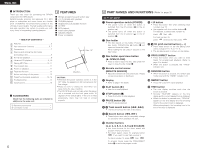
ENGLISH 2 INTRODUCTION Thank you very much for purchasing the DENON component CD / MP3 player. DENON proudly presents this advanced CD / MP3 player to audiophiles and music lovers as a further proof of DENON's non-compromising pursuit of the ultimate in sound quality. The high quality performance and easy operation are certain to provide you with many hours of outstanding listening pleasure. 1 FEATURES 2 99-track programming and random play 2 ±12 % Variable pitch playback 2 CD-R/RW playback 2 Single/continuous playback function 2 CD TEXT 2 MP3 playback 2 Instant start playback 2 Cascade playback 2 Power on playback - TABLE OF CONTENTS - z Features 6 x Part names and functions 6, 7 c Connections 7 v Opening and closing the disc holder and loading a disc 8 b Normal CD playback 8 n Advanced CD playback 9, 10 m Playing MP3 files 10, 11 , The compact disc 11 . Power on playback 11 ⁄0 Expanded function 12 ⁄1 Before switching off the power 13 ⁄2 Preset functions and operations 13, 14 ⁄3 Troubleshooting 15 ⁄4 Specifications 15 2 ACCESSORIES Check that the following parts are included in addition to the main unit: q Operating instructions 1 w Connection Cords 1 Max. 10° DN-C615 CAUTION: • Whenever the power operation switch is in the OFF state, the apparatus is still connected on AC line voltage. • Please be sure to unplug the cord when you leave home for, say, a vacation. • The DN-C615 will work normally when the player unit is mounted with the front panel within 10 degrees of the vertical plane. If the unit is tilted excessively, discs may not load or unload properly. 6 2 PART NAMES AND FUNCTIONS (Refer to page 3.) (1) Front panel q Power operation switch (POWER) • The power turns on when the button is switched from the off position (£) to the on position (¢). • The power turns off when the button is switched from the on position (¢) to the off position (£). w Disc holder • The disc placed on this holder. Pressing the disc holder OPEN/CLOSE (5) button e will open and close the holder. When loading the CD, place it securely in the disc holder. e Disc holder open/close button (5 OPEN/CLOSE) • Press to load or eject the disc. Each press will open or close the disc holder w. r Remote control sensor (REMOTE SENSOR) • About the wireless remote control unit : Please contact local dealer or distributor. !4 +10 button • Press this button first when selecting track numbers over 10. • Use together with the number buttons !3. For example, to select track number 15, press then . For track number 33, press three times, then press . !5 !6 CD pitch control button (-, +) • Press these button to set the playing pitch within a range of ±12 % to -12 %. • The set playing pitch is shown on the display. !7 PROG./DIRECT button • Press this button when you want to enter tracks for programmed playback. (Refer to page 9 for details.) • When the button is pressed, the "PROG" indicator is lit. !8 RANDOM button • When this button is pressed, the random play mode is set and the "RAND" indicator is lit. t Display • Refer to page 7 for details. !9 REPEAT button • Press this to perform repeat playback. y PLAY button (1) • Use this to start playback. u STOP button (2) • Press this button to stop playback. i PAUSE button (3) • Use this pause playback. o !0 Track search button (8 , 9) • This button selects the track to be played. @0 TIME button • The time display switches each time this button is pressed. • Normally "ELAPSED" appears on the time display and the current elapsed time is displayed. • When this button is pressed once, "REMAIN" appears on the time display and the remaining time for the current track is displayed. When pressed again, the remaining time to the end of the disc is displayed. !1 !2 Search button (6 , 7) • These buttons are used to accurately change the positions where playback will start. !3 Number buttons (1, 2, 3, 4, 5, 6, 7, 8, 9 and 0/CLEAR) • Use these buttons for the direct search and program memory functions. • For direct search, press for example button if you want to hear track number 3. For track number 12, press then . To program tracks, press the PROG./DIRECT button !7 to set to the program mode.
-
 1
1 -
 2
2 -
 3
3 -
 4
4 -
 5
5 -
 6
6 -
 7
7 -
 8
8 -
 9
9 -
 10
10 -
 11
11 -
 12
12 -
13
-
14
-
15
-
16
-
17
-
18
-
19
-
20
-
21
-
22
-
23
-
24
-
25
-
26
 |
 |
