Denon DNC615 Operating Instructions - Page 8
Opening And Closing The Disc Holder And Loading A Disc, 5. Normal Cd Playback - manual
 |
View all Denon DNC615 manuals
Add to My Manuals
Save this manual to your list of manuals |
Page 8 highlights
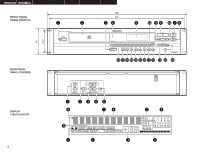
ENGLISH 4 OPENING AND CLOSING THE DISC HOLDER AND LOADING A DISC Opening and closing the disc holder ✽. This operation only works while the power is on. 1. Press the power operation switch q to turn on the power. 2. Press the OPEN/CLOSE button e. How to load a disc • Make sure the disc holder is completely open. • Hold the disc by the edges and place it on the disc tray. (Do not touch the signal surface, i.e., the glossy side.) • When using 12 cm. diameter discs, make sure the outer edge matches the tray guide circumference and when using CD signals (8 cm. diameter) match the outer edge with the inner tray guide circumference. • Press the OPEN/CLOSE button e to close the disc holder w. • When the disc holder is open and a disc is loaded, you may also press the PLAY (1) button y to close the disc holder. (If the PLAY (1) button is pressed, playback will start immediately upon the disc contents having been read.) CAUTIONS: • If you finger should get caught in the disc holder when it closes, press the OPEN/CLOSE button. • Do not place any foreign objects on the disc tray, and do not place more than one disc on the tray at a time. Otherwise malfunction may occur. • Do not push in the disc tray manually when the power is off as this may cause malfunction and damage the CD player. • This player can play CD-R/RW discs, but only if they are finalized. Note however that depending on the recording quality, the player may not be able to play some finalized CD-R/RW discs. 2 Messages Messages may appear on the display while using the DN-C615. The meanings of these messages are explained below. Message No Disc TOC Error Invalid CD Tray Error Meaning No disc inserted, disc unreadable or disc inserted upside down. The disc information has not been read properly. The disc is a CD-ROM that does not contain MP3 files. The disc holder could not be opened or closed properly. 5 NORMAL CD PLAYBACK (1) Starting playback 1. Press the power operation switch q to turn on the power. 2. Load the disc you want to play. 3. Make the presettings according to the usage purpose. (See page 13.) • Select the play finish mode. (Preset functions) Finish stop : The stop mode (the servo functions turn off) is set when playback finishes. Finish next : The standby mode is set at the beginning of the next track when playback is finished. ✽ After the final track is played, the standby mode is set at the beginning of the first track. Finish recue : When playback is finished, the standby mode is set at the position at which playback was started. • To standby at the point where the sound begins. (Preset functions) Set the "C Det" level. When a track is selected, the position at which the sound begins is found when a track is cued and the standby mode is set at that point. • Select the play mode. (Preset function) SINGLE : (single track play mode) The stop mode is set after the specified track is played. CONT. : (continuous play mode) The stop mode is set after the last track is played. 4. Press the PLAY (1) button y. (2) Pausing playback at any point (Pause) Playback can be temporarily halted and then continued from the same point in the track. 1. Press the PAUSE (3) button i during playback. 2. To continue playback, press the PLAY (1) button y. Auto Cue (Preset functions) • Auto Cue is automatically cued to the point where audio starts. Cueing takes place at the point where audio starts rather than where the track starts. The level at which sound is first detected can be set between -36 to -48 dB (3 steps). End of Message (EOM) (Preset functions) • At the end of the track, the time display flashes, providing a visual warning to the operator that the track will end shortly. The point at which the flashing beings can be set within a range of 0 to 60 seconds (7 steps) prior to the end of the track. Sleep mode (Preset functions) • The sleep mode is set if no operation is performed for set-up time in the standby, pause or manual search mode. When in the sleep mode, if the PLAY/PAUSE button is pressed, playback will be started from the beginning of the track in which the sleep mode was set. If the CUE button is pressed, it will standby for the beginning of the track in which the sleep mode was set. (3) Stopping playback 1. Press the STOP (2) button u. 8
-
 1
1 -
2
-
 3
3 -
 4
4 -
 5
5 -
 6
6 -
 7
7 -
 8
8 -
 9
9 -
 10
10 -
 11
11 -
 12
12 -
 13
13 -
14
-
15
-
16
-
17
-
18
-
19
-
20
-
21
-
22
-
23
-
24
-
25
-
26
 |
 |