Dynex DX-L19-10A User Manual (English)
Dynex DX-L19-10A - 19" LCD TV Manual
 |
UPC - 600603122408
View all Dynex DX-L19-10A manuals
Add to My Manuals
Save this manual to your list of manuals |
Dynex DX-L19-10A manual content summary:
- Dynex DX-L19-10A | User Manual (English) - Page 1
15", 19", and 22" LCD TVs DX-L15-10A/DX-L19-10A/DX-L22-10A USER GUIDE - Dynex DX-L19-10A | User Manual (English) - Page 2
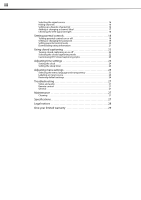
ii Dynex DX-L15-L19-L22-10A 15", 19", and 22" LCD TVs Contents Child Safety 1 Important safety instructions 2 Warnings 2 Cautions 2 Installing and removing the stand 3 Installing the stand 3 Adjusting the viewing angle of the TV 4 Removing the stand 4 Installing a wall-mount bracket 4 TV - Dynex DX-L19-10A | User Manual (English) - Page 3
menu settings 25 Selecting the menu language and transparency 25 Labeling an input source 26 Restoring default settings 26 Troubleshooting 27 Video and audio 27 Remote control 27 General 27 Maintenance 27 Cleaning 27 Specifications 27 Legal notices 28 One-year limited warranty 29 - Dynex DX-L19-10A | User Manual (English) - Page 4
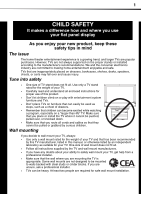
listed in this manual, or otherwise listed by an independent laboratory as suitable for your TV. One size of wall mount does not fit all. • Follow all instructions supplied by the TV and wall mount manufacturers. • If you have any doubts about your ability to safely wall mount your TV, get help from - Dynex DX-L19-10A | User Manual (English) - Page 5
to your home, consult an electrician or your local power company. Cautions Damage requiring service Unplug this TV from the power outlet and refer servicing to qualified service personnel under the following conditions: • When the power supply cord or plug is damaged or frayed. • If liquid has - Dynex DX-L19-10A | User Manual (English) - Page 6
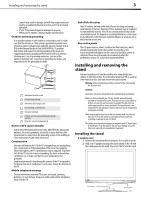
other flat surface. If you intend to mount your TV on a wall or other vertical surface, you must remove the stand column. Warning: Before attempting assembly or removal of the stand, unplug the AC power cord. Cautions: Read these instructions thoroughly before attempting this installation. Make sure - Dynex DX-L19-10A | User Manual (English) - Page 7
holding the stand column to your TV, then remove the stand and the stand column. Note: The appearance of this product in these illustrations may differ from your actual product, and is for comparative purposes only. To attach your TV to a wall-mount bracket: Warning: These servicing instructions are - Dynex DX-L19-10A | User Manual (English) - Page 8
TV components 5 TV components Back Front Model DX-L15-10A is used in this manual for illustration purposes. # Component Description 1 Remote sensor Receives signals from the remote control. Do not block. 2 Power indicator Lights blue when your TV is turned on. Lights red when your TV is in - Dynex DX-L19-10A | User Manual (English) - Page 9
TV components Remote control INFO # Button Description 1 (Power) Press to turn on your TV. Press again to put your TV in Standby mode. 2 COMP/HDMI/ VIDEO/TV submenu. 10 GUIDE Press to open the DTV program guide (if Selecting the audio mode" on page 15. Press to turn closed captioning - Dynex DX-L19-10A | User Manual (English) - Page 10
both your set-top box and your TV. Five such remotes are listed on the chart, but many other compatible models are available in the market. For more help, call technical support for your universal remote control or set-top box manufacturer, or call the Dynex Customer Care Center at 1-800-305-2204 - Dynex DX-L19-10A | User Manual (English) - Page 11
cord or other cables. If the antenna is not installed correctly, contact qualified service personnel to correct the problem. Connecting a VCR To connect a VCR: 1 Make sure that your TV's power cord is unplugged and the VCR is turned off. 2 Connect an AV cable to the AV VIDEO OUT jack on the VCR - Dynex DX-L19-10A | User Manual (English) - Page 12
camcorder's or game's user guides for more information. Connecting an HDMI device To connect an HDMI device: 1 Make sure that your TV's power cord is unplugged and jack on the back of your TV. Note: The VGA cable should be a 15-pin D-Sub (analog RGB) cable. Back of TV Computer D-Sub cable (analog RGB - Dynex DX-L19-10A | User Manual (English) - Page 13
still lets you hear the sound. Turning on your TV for the first time To configure your TV: 1 Make sure that you have inserted the batteries in the remote control, connected the antenna to the TV, and connect the AC power. 2 Press (Power), then wait several seconds. The initial Setup Wizard screen - Dynex DX-L19-10A | User Manual (English) - Page 14
power. To completely disconnect power, unplug the power cord. Note: If your TV does not receive an input signal for several minutes, it automatically goes into standby mode. Selecting the video input source To select the video input source: 1 Turn on your TV, then press the INPUT key on the remote - Dynex DX-L19-10A | User Manual (English) - Page 15
confirm your selection or enter a sub-menu. Press to return to the previous screen. Press to close the menu. Digital sub-channels A digital TV signal transmits more data than an analog signal. This increase in data provides a better picture and sound with less static and interference. The increased - Dynex DX-L19-10A | User Manual (English) - Page 16
, and resolution. 2 Press GUIDE to show the digital program guide, which may show a list ENTER to open the Advanced Video sub menu. Adjusting the TV picture To adjust the picture: 1 Press MENU. The on picture). You can also press PICTURE on the remote control to select the picture mode. • Contrast - Dynex DX-L19-10A | User Manual (English) - Page 17
optimize the picture display for a more vivid image. • Auto Zoom-In TV mode, setting Auto Zoom to On lets you set the Zoom Mode menu. Adjusting the computer image To adjust the computer image: 1 Make sure that your TV is in VGA mode. For more information, see "Selecting the video input source" on - Dynex DX-L19-10A | User Manual (English) - Page 18
15 Selecting the audio mode You can select the audio mode for analog channels. To select the audio mode for analog channels: • Press MTS/SAP on the remote the menu. Notes: Audio Only works only when the input source is TV and your TV is receiving a broadcast signal. To exit Audio Only mode, press - Dynex DX-L19-10A | User Manual (English) - Page 19
or to select Air or Cable. 4 Press EXIT to close the menu. Hiding channels You can delete channels from the channel list so that your TV skips the channels when you press CH /CH . You can still tune to the hidden channel by using the number buttons. To hide a channel: 1 Press - Dynex DX-L19-10A | User Manual (English) - Page 20
Changing channel settings 17 2 Press or to highlight Channel, then press . The Channel menu opens. Adding or changing a channel label If a channel is not already labeled, you can label the channel to make it easier to identify. You can also relabel a channel that is already labeled. To label a - Dynex DX-L19-10A | User Manual (English) - Page 21
strength: 1 Press MENU. The on-screen menu opens. Setting parental controls Parental controls let you prevent your children from watching inappropriate material on TV. When set, parental controls read the rating of the program (with some exceptions, such as news and sports) and deny access to - Dynex DX-L19-10A | User Manual (English) - Page 22
Setting parental controls 19 4 Press the number buttons to enter the four-digit password. The default password is 0000. The Parental Controls sub menu opens. 3 Press ENTER. The Enter Password screen opens. 4 Press the number buttons to enter the four-digit password. The default password is 0000. - Dynex DX-L19-10A | User Manual (English) - Page 23
You can set parental controls for the U.S. and Canada. The following procedure shows how to set controls for U.S. TV ratings. You use similar steps for controlling U.S. movie and Canadian TV ratings. To set parental controls: 1 Press MENU. The on-screen menu opens. 5 Press or to highlight System - Dynex DX-L19-10A | User Manual (English) - Page 24
21 9 Press EXIT to close the menu. U.S. TV ratings (age-based) TV-Y All children. TV-Y7 Suitable for children 7 and older. TV-G General audiences. TV-PG Parental guidance suggested. TV-14 Parental guidance strongly suggested. TV-MA Mature audiences only. Downloading rating information - Dynex DX-L19-10A | User Manual (English) - Page 25
clear the downloaded rating information, select Reset RRT. The rating information is cleared. If rating information is broadcast by another program, your TV downloads the new rating information. Using closed captioning Turning closed captioning on or off To turn closed captioning on or off: 1 Press - Dynex DX-L19-10A | User Manual (English) - Page 26
Using closed captioning 3 Press or to highlight Closed Caption, then press or ENTER. The closed caption menu opens. 23 2 Press or to highlight Setup, then press . The Setup menu opens. Parental Controls 4 Press or to highlight CC Mode, then press or to select On. 5 Press or to highlight Basic - Dynex DX-L19-10A | User Manual (English) - Page 27
opacity level for the words • BG Opacity-Selects the opacity level for the background 10 Press MENU to return to the previous menu, or press EXIT to close the menu a digital channel and does not need to be set manually. 6 Press EXIT to close the menu. Setting the sleep timer You can specify the - Dynex DX-L19-10A | User Manual (English) - Page 28
Sleep Timer, then press or to select the amount of time you want your TV to wait before it automatically turns off. Note: To turn off the sleep Press EXIT to close the menu. Note: You can also press SLEEP on the remote control to set the sleep timer. 2 Press or to highlight Setup, then press . - Dynex DX-L19-10A | User Manual (English) - Page 29
add more characters. 7 To reset the label to the factory default, press or to highlight Reset Label and press ENTER, then follow the on-screen instructions. 8 Press MENU to exit. - Dynex DX-L19-10A | User Manual (English) - Page 30
the instructions that came with the cloth. Specifications Design and specifications are subject to change without notice. Dimensions and weight are approximate. TV type LCD TV panel 15-inch (DX-L15-10A) TFT LCD 19-inch (DX-L19-10A) TFT LCD TV system Channels 22-inch (DX-L22-10A) TFT LCD NTSC - Dynex DX-L19-10A | User Manual (English) - Page 31
6.18 lbs. (2.8 kg) - 15" 8.82 lbs. (4 kg) - 19" 10 lbs. (4.5 kg) - 22" instructions Television Receiving Apparatus - Appareil de réception télévision ordinaire, Canada BETS-7 / NTMR-7 Notices Specifications and features are subject to change without notice or obligation. For service and support - Dynex DX-L19-10A | User Manual (English) - Page 32
Dynex Products ("Dynex") warrants to you, the original purchaser of this new DX-L15-10A, DX-L19-10A, or DX-L22-10A service for a television with SPECIFIC LEGAL RIGHTS, AND YOU MAY ALSO HAVE OTHER RIGHTS, WHICH VARY FROM STATE TO STATE OR PROVINCE TO PROVINCE. Contact Dynex: For customer service - Dynex DX-L19-10A | User Manual (English) - Page 33
by Best Buy Purchasing, LLC 7601 Penn Ave. South, Richfield, MN 55423 U.S.A. © 2009 Best Buy Enterprise Services, Inc. All rights reserved. DYNEX is a trademark of Best Buy Enterprise Services, Inc. Registered in some countries. All other products and brand names are trademarks of their respective
-
 1
1 -
 2
2 -
 3
3 -
 4
4 -
 5
5 -
 6
6 -
 7
7 -
8
-
9
-
10
-
11
-
12
-
13
-
14
-
15
-
16
-
17
-
18
-
19
-
20
-
21
-
22
-
23
-
24
-
25
-
26
-
27
-
28
-
29
-
30
-
31
-
32
-
33
 |
 |

15", 19", and 22" LCD TVs
DX-L15-10A/DX-L19-10A/DX-L22-10A
USER GUIDE