Dynex DX-L19-10A User Manual (English) - Page 7
Adjusting the viewing angle of the TV, Removing the stand, Installing a wall-mount bracket
 |
UPC - 600603122408
View all Dynex DX-L19-10A manuals
Add to My Manuals
Save this manual to your list of manuals |
Page 7 highlights
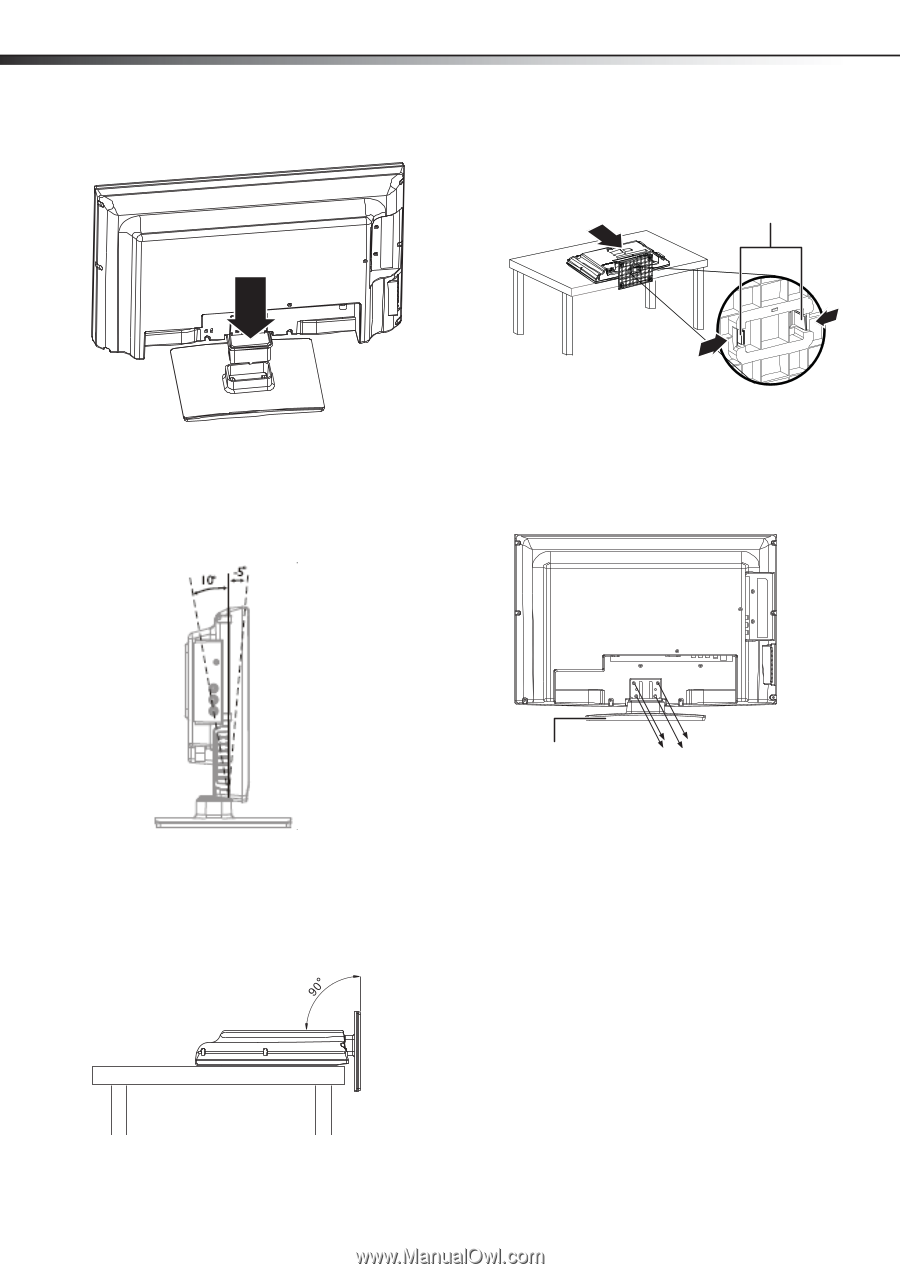
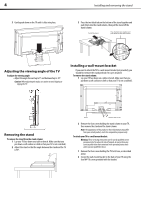
4 3 Gently push down on the TV until it clicks into place. Installing and removing the stand 3 Press the two black tabs on the bottom of the stand together and push them into the stand column, then pull the stand off the stand column. Pull off the stand. Press the black tabs together and push them into the stand column. Adjusting the viewing angle of the TV To adjust the viewing angle: • Adjust the angle forward up to 5° and backward up to 10°. Caution: When adjusting the angle, use caution to avoid slipping or tipping the TV. Installing a wall-mount bracket If you want to attach the TV to a wall-mount bracket (not provided), you should first remove the stand pedestal if it is pre-attached. To remove the stand column: 1 Lay your TV face down on a table or bench. Make sure that you put down a soft cushion or cloth so that your TV is not scratched). Removing the stand To remove the stand from the stand column: 1 Lay your TV face down on a table or bench. Make sure that you put down a soft cushion or cloth so that your TV is not scratched). 2 Adjust the stand so that the angle between the stand and the TV is 90°. Stand Remove four screws 2 Remove the four screws holding the stand column to your TV, then remove the stand and the stand column. Note: The appearance of this product in these illustrations may differ from your actual product, and is for comparative purposes only. To attach your TV to a wall-mount bracket: Warning: These servicing instructions are for use by qualified service personnel only. To reduce the risk of hazards, do not perform any servicing other than that contained in the operating instructions unless you are qualified to do so. 1 Remove the four screws holding the TV to its base, as described above. 2 Secure the wall-mount bracket to the back of your TV using the four M4*10 screws provided with the bracket.
-
 1
1 -
 2
2 -
 3
3 -
 4
4 -
 5
5 -
 6
6 -
 7
7 -
 8
8 -
 9
9 -
 10
10 -
 11
11 -
 12
12 -
13
-
14
-
15
-
16
-
17
-
18
-
19
-
20
-
21
-
22
-
23
-
24
-
25
-
26
-
27
-
28
-
29
-
30
-
31
-
32
-
33
 |
 |