Dynex DX-L19-10A User Manual (English) - Page 11
Making connections, Connecting the power, Connecting an antenna, cable TV, or satellite TV box - user manual
 |
UPC - 600603122408
View all Dynex DX-L19-10A manuals
Add to My Manuals
Save this manual to your list of manuals |
Page 11 highlights
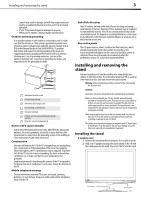
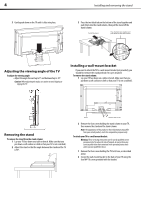
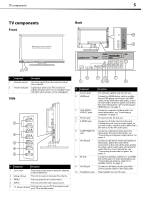
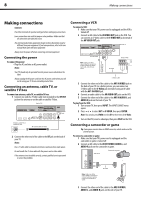
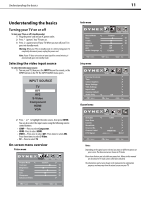
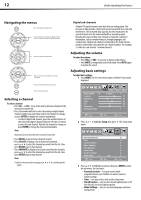
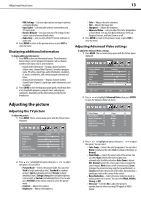
8 Making connections Making connections Cautions: Check the terminals for position and type before making any connections. Loose connections can result in image or color problems. Make sure that all connections are tight and secure. The external audio/video equipment shown in these illustrations may be different from your equipment. If you have questions, refer to the user manual that came with your equipment. Always turn the power off when connecting external equipment. Connecting the power To connect the power: • Plug the AC cord into an AC power outlet. Notes: Your TV should only be operated from the power source indicated on the label. Always unplug the AC power cord from the AC power outlet when you will not be using your TV for an extended period of time. Connecting an antenna, cable TV, or satellite TV box To connect an antenna, cable TV, or satellite TV box: 1 Connect one end of a 75 ohm cable (not included) to the RF OUT jack on the antenna or on the cable or satellite TV box. Back of TV RF jack Antenna, cable TV, or satellite RF jack RF coaxial cable (75 ohm) 2 Connect the other end of the cable to the RF jack on the back of your TV. Notes: Use a 75 ohm cable to eliminate interference and noise from radio waves. Do not bundle the 75 ohm cable with the power cord or other cables. If the antenna is not installed correctly, contact qualified service personnel to correct the problem. Connecting a VCR To connect a VCR: 1 Make sure that your TV's power cord is unplugged and the VCR is turned off. 2 Connect an AV cable to the AV VIDEO OUT jack on the VCR. You can connect an S-Video cable to the S-VIDEO OUT jack instead of the AV VIDEO OUT jack. Back of TV AV1 IN AUDI-L and AUDIO-R jacks AV1 IN VIDEO Note: Cables are often color-coded to connectors. Connect yellow to yellow, red to red, and white to white. Back of VCR AV cable S-Video cable 3 Connect the other end of the cable to the AV1 IN VIDEO jack on the back of your TV. For a better picture, you can connect an S-Video cable to the S-Video jack instead of using an AV cable with the AV1 IN VIDEO jack. 4 Connect an audio cable to the AV AUDIO OUT jacks on the VCR. 5 Connect the other end of the cable to the AV1 IN AUDIO-L and AUDIO-R jacks on the back of your TV. To play from the VCR: 1 Turn on your TV, then press INPUT. The INPUT SOURCE menu opens. 2 Press or to select AV1 or S-VIDEO, then press ENTER. Note: You can also press VIDEO once for AV1 or three times for S-Video. 3 Turn on the VCR, insert a videotape, then press PLAY on the VCR. Connecting a camcorder or game Tip: Some game consoles have an HDMI connector, which can be used for a better picture. To connect a camcorder or game: 1 Make sure that your TV's power cord is unplugged and the camcorder or game is turned off. 2 Connect an AV cable to the AV OUT VIDEO, AUDIO-L, and AUDIO-R jacks on the camcorder or game. Side of TV Camcorder or game Note: Cables are often color-coded to connectors. Connect yellow to yellow, red to red, and white to white. AV cable 3 Connect the other end of the cable to the AV2 IN VIDEO, AUDIO-L, and AUDIO-R jacks on the side of your TV.
-
 1
1 -
2
-
3
-
4
-
5
-
 6
6 -
 7
7 -
 8
8 -
 9
9 -
 10
10 -
 11
11 -
 12
12 -
 13
13 -
 14
14 -
 15
15 -
 16
16 -
17
-
18
-
19
-
20
-
21
-
22
-
23
-
24
-
25
-
26
-
27
-
28
-
29
-
30
-
31
-
32
-
33
 |
 |
