E-Z-GO Shuttle 22 TXT - Electric Owner Manual - Page 27
Grab Handles - Front Passenger, Brake Light/Turn Signal
 |
View all E-Z-GO Shuttle 22 TXT - Electric manuals
Add to My Manuals
Save this manual to your list of manuals |
Page 27 highlights
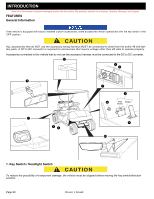
INTRODUCTION Read all of this manual to become thoroughly familiar with this vehicle. Pay particular attention to all Notices, Cautions, Warnings, and Dangers. Located on the dash panel, the key switch enables the electrical system of the vehicle to be turned on and off by turning the key and the headlight is operated by turning the key switch beyond ON position. To prevent inadvertent operation of the vehicle when left unattended, the key should be turned to the 'OFF' position and removed. 2. State of Charge Meter The vehicle is equipped with a state of charge meter located in the dash panel below the speedometer. The state of charge meter indicates the amount of usable power in the batteries. The state of charge meter shows the condition of the battery pack with F indicating a full charge on the battery pack and E indicating the battery pack needs to be charged. 3. Direction Selector To prevent loss of control, do not move vehicle direction selector while the vehicle is in motion. Moving the selector will result in sudden slowing of the vehicle and the beeping of a warning device. Located on the dash panel, this switch permits the selection of either 'F' (forward), 'R' (reverse) or neutral (the position between forward and reverse). Vehicle should be left in neutral when unattended 4. Accelerator Pedal With the key switch 'ON', depressing the accelerator pedal starts the motor. When the pedal is released, the motor will stop. To stop the vehicle more quickly, depress the service brake. 5. Brake and Park Brake The brake pedal incorporates a park brake feature. To engage the park brake, push down on the upper section of the pedal until it locks in place. The park brake will release when the service brake pedal is depressed. Use the lower section of the brake pedal to operate the service brake system. 6. Horn The horn button is located on the driver's side floorboard; depressing the button will sound the vehicle's horn. 7. Rear View Mirror The rear view mirror is a two-position mirror manually adjusted for day and nighttime conditions.Sun Top kit is required to install rear view mirror. 8. Front Seats The front seat is designed for two occupant on each side of the seat. 9. Hip Restraint - Front The front hip restraints are designed to help keep the occupants properly positioned in the event of sudden vehicle position changes. 10. Front Light bar The vehicle is equipped with single Front Light bars. 11. Brake Light/Turn Signal The combination brake light/turn signal assemblies are located on the rear fenders. 12. Grab Handles - Front Passenger The vehicle is equipped with grab handles. 13. Glove Box A passenger-side locking glove box is standard, driver-side is offered as an option. A separate key is used for the locking glove boxes. 14. Cup Holder A cup holder is provided for convenience of both the driver and passenger. Owner's Guide Page 21
-
 1
1 -
2
-
3
-
4
-
5
-
6
-
7
-
8
-
9
-
10
-
11
-
12
-
13
-
14
-
15
-
16
-
17
-
18
-
19
-
20
-
21
-
 22
22 -
 23
23 -
 24
24 -
 25
25 -
 26
26 -
 27
27 -
 28
28 -
 29
29 -
 30
30 -
 31
31 -
 32
32 -
33
-
34
-
35
-
36
-
37
-
38
-
39
-
40
-
41
-
42
-
43
-
44
-
45
-
46
-
47
-
48
-
49
-
50
-
51
-
52
-
53
-
54
-
55
-
56
-
57
-
58
-
59
-
60
-
61
-
62
-
63
-
64
-
65
-
66
-
67
-
68
-
69
-
70
-
71
-
72
 |
 |
