E-Z-GO Shuttle 22 TXT - Electric Owner Manual - Page 47
Wheel Installation
 |
View all E-Z-GO Shuttle 22 TXT - Electric manuals
Add to My Manuals
Save this manual to your list of manuals |
Page 47 highlights
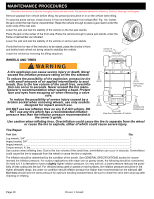
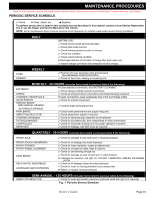
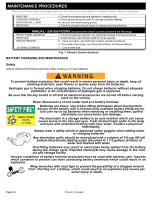
MAINTENANCE PROCEDURES Read all of this manual to become thoroughly familiar with this vehicle. Pay particular attention to all Notices, Cautions, Warnings, and Dangers. The vehicle is fitted with low pressure tubeless tires mounted on one piece rims; therefore, the most cost effective way to repair a puncture in the tread is to use a commercial tire plug. NOTICE Tire plug tools and plugs are available at most automotive parts outlets and have the advantage of not requiring the tire be removed from the wheel. If the tire is flat, remove the wheel and inflate the tire to the maximum recommended pressure for the tire. Immerse the tire in water to locate the leak and mark with chalk. Insert tire plug in accordance with manufacturer's instructions. To reduce the possibility of severe injury, be sure the mounting/demounting machine is anchored to floor. Wear OSHA approved safety equipment when mounting/demounting tires. If the tire is to be removed or mounted, the tire changing machine manufacturer's recommendations must be followed in order to reduce possibility of severe injury. Wheel Installation To reduce the possibility of component damage, do not tighten lug nuts to more than 85 ft. lbs. (115 Nm) torque. It is important to follow the 'cross sequence' pattern when installing lug nuts. This will assure even seating of the wheel against the hub. With the valve stem to the outside, mount the wheel onto the hub with lug nuts. Finger tighten the lug nuts (1) in a 'cross sequence' pattern. Tighten the lug nuts to 50 to 85 ft. lbs. (68 to 115 Nm) torque in 20 ft. lbs. (27 Nm) increments following the 'cross sequence' pattern. Valve Stem Cap Tire style may vary Cross Sequence Owner's Guide Page 41
-
 1
1 -
2
-
3
-
4
-
5
-
6
-
7
-
8
-
9
-
10
-
11
-
12
-
13
-
14
-
15
-
16
-
17
-
18
-
19
-
20
-
21
-
22
-
23
-
24
-
25
-
26
-
27
-
28
-
29
-
30
-
31
-
32
-
33
-
34
-
35
-
36
-
37
-
38
-
39
-
40
-
41
-
 42
42 -
 43
43 -
 44
44 -
 45
45 -
 46
46 -
 47
47 -
 48
48 -
 49
49 -
 50
50 -
 51
51 -
 52
52 -
53
-
54
-
55
-
56
-
57
-
58
-
59
-
60
-
61
-
62
-
63
-
64
-
65
-
66
-
67
-
68
-
69
-
70
-
71
-
72
 |
 |
