Electrolux ELFG7437AG Complete Owners Guide - Page 20
Electrical connection, non-Canada - 3 wire cord, IMPORTANT, WARNING
 |
View all Electrolux ELFG7437AG manuals
Add to My Manuals
Save this manual to your list of manuals |
Page 20 highlights
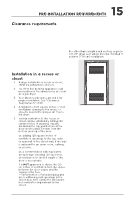
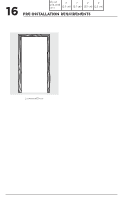
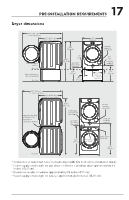
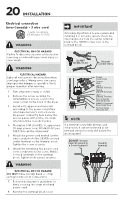
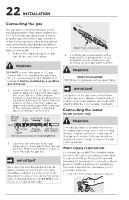
20 INSTALLATION Electrical connection (non-Canada) - 3 wire cord 3-wire receptacle (NEMA type 10-30R) WARNING IMPORTANT If moving dryer from a 4-wire system and installing it in a 3-wire system, move the internal ground from the center terminal back to the GREEN screw next to the terminal block. ELECTRICAL SHOCK HAZARD Failure to disconnect power source before servicing could result in personal injury or even death. WARNING 30 AMP NEMA 10-30 Neutral (center wire) ELECTRICAL HAZARD Label all wires prior to disconnection when servicing controls. Wiring errors can cause improper and dangerous operation. Verify proper operation after servicing. 1. Turn off power supply to outlet. 2. Remove the screw securing the terminal block access cover in the lower corner on the back of the dryer. 3. Install a UL-approved strain relief according to the power cord/strain relief manufacturer's instructions in the power cord entry hole below the access panel. At this time, the strain relief should be loosely in place. NOTE Access Cover Screw Terminal Block Line 2 (BRASS Terminal) Neutral (SILVER Terminal) Line 1 (BRASS Terminal) Internal Ground (GREEN Screw) Install UL-Approved Strain Relief Here Terminal Screw Recovery Slot 4. Thread an UNPLUGGED, UL-approved, 30 amp. power cord, NEMA 10-30 type SRDT, through the strain relief. 5. Attach the power cord neutral (center wire) conductor to the SILVER colored center terminal on the terminal block. Tighten the screw securely. 6. Attach the remaining two power cord outer conductors to the outer, BRASS colored terminals on the terminal block. Tighten both screws securely. If a terminal screw falls during cord installation, it can be retrieved in the terminal screw recovery slot below the access panel. DO NOT remove internal ground in a 3-wire system!! Neutral terminal WARNING ELECTRICAL SHOCK HAZARD DO NOT make a sharp bend or crimp wiring/conductor at connections. 7. Follow manufacturer's guidelines for firmly securing the strain relief and power cord. 8. Reinstall the terminal block cover.
-
 1
1 -
2
-
3
-
4
-
5
-
6
-
7
-
8
-
9
-
10
-
11
-
12
-
13
-
14
-
 15
15 -
 16
16 -
 17
17 -
 18
18 -
 19
19 -
 20
20 -
 21
21 -
 22
22 -
 23
23 -
 24
24 -
 25
25 -
26
-
27
-
28
-
29
-
30
-
31
-
32
-
33
-
34
-
35
-
36
-
37
-
38
-
39
-
40
-
41
-
42
-
43
-
44
-
45
-
46
-
47
-
48
 |
 |
