Electrolux ELFG7437AG Complete Owners Guide - Page 24
Completing the installation, CAUTION, IMPORTANT, WARNING
 |
View all Electrolux ELFG7437AG manuals
Add to My Manuals
Save this manual to your list of manuals |
Page 24 highlights
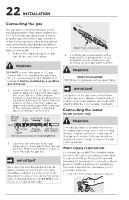
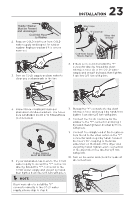
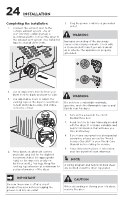
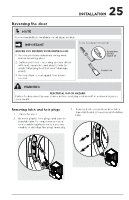
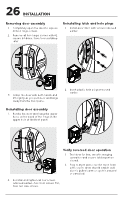
24 INSTALLATION Completing the installation 1. Connect the exhaust duct to the outside exhaust system. Use of a 4" (102 mm) clamp (item A) is recommended to connect the dryer to the exhaust vent system. Use metal foil tape to seal all other joints. 5. Plug the power cord into a grounded outlet. WARNING Improper grounding of the dryer may cause serious injury or death. Check with a licensed electrician if you are in doubt as to whether the appliance is properly grounded. 1 2 2. Use a carpenter's level to level your dryer front-to-back and side-to-side. 3. Use adjustable pliers to adjust the leveling legs so the dryer is level frontto-rear and side-to-side, and stable corner-to-corner. WARNING Do not store combustible materials, gasoline, and other flammable vapors and liquids near this dryer. 6. Turn on the power at the circuit breaker/fuse box. 7. Read the Use & Care Manual provided with the dryer. It contains valuable and helpful information that will save you time and money. 8. If you have any questions during initial operation, please review the "Avoid Service Checklist" in your Use & Care Manual before calling for service. 9. Place these instructions in a location 4. Press down on alternate corners near the dryer for future reference. and sides and feel for the slightest movement. Adjust the appropriate leg(s) so the dryer sits solidly on NOTE the floor on ALL four legs. Keep the leveling leg extension at a minimum for best performance of the dryer. A wiring diagram and technical data sheet are located under the dryer top panel. IMPORTANT Be sure the power is off at a circuit breaker/fuse box before plugging the power cord into an outlet. CAUTION When discarding or storing your old dryer, remove the door.
-
 1
1 -
2
-
3
-
4
-
5
-
6
-
7
-
8
-
9
-
10
-
11
-
12
-
13
-
14
-
15
-
16
-
17
-
18
-
 19
19 -
 20
20 -
 21
21 -
 22
22 -
 23
23 -
 24
24 -
 25
25 -
 26
26 -
 27
27 -
 28
28 -
 29
29 -
30
-
31
-
32
-
33
-
34
-
35
-
36
-
37
-
38
-
39
-
40
-
41
-
42
-
43
-
44
-
45
-
46
-
47
-
48
 |
 |
