Electrolux ELFG7437AG Complete Owners Guide - Page 41
CARE AND CLEANING, Inside, Outside, Cleaning the filter
 |
View all Electrolux ELFG7437AG manuals
Add to My Manuals
Save this manual to your list of manuals |
Page 41 highlights
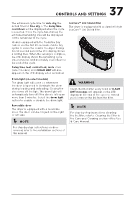
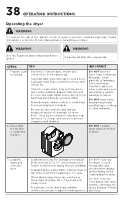
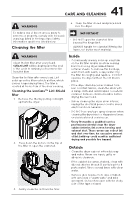
41 CARE AND CLEANING WARNING 4. Snap the filter closed and place back into the dryer. To reduce risk of fire or serious injury to persons or property, comply with the basic warnings listed in the Important Safety Information and those listed below. Cleaning the filter IMPORTANT • DO NOT open the clamshell filter beyond the hinge limit. • ALWAYS handle the clamshell filter by the frame, not by the mesh material. WARNING Clean the lint filter after every load. CLEAN LINT will be displayed at the end of the cycle to remind you to remove lint from the filter. Clean the lint filter after every load. Lint build-up on the filter restricts air flow, which causes longer drying times. The filter is located at the bottom of the door opening. Cleaning the LuxCareTM Lint Shield filter 1. Remove the filter by pulling it straight up from the dryer. 2. Press down the button on the top of the filter to open the clamshell. Inside • Occasionally a waxy build-up may form on the lint filter and/or moisture sensing bars from using dryer-added fabric softener sheets. To remove this build-up, wash them with warm, soapy water. Dry the filter thoroughly and replace. DO NOT operate the dryer without the lint filter in place. • If the dryer drum becomes stained from non colorfast fabrics, clean the drum with a damp cloth and a mild liquid household cleanser. Remove cleanser residue before drying the next load. • Before cleaning the dryer drum interior, unplug the electrical power cord to avoid electrical shock hazards. • DO NOT use any type spray cleanser when cleaning the dryer interior. Hazardous fumes or electrical shock could occur. • Every 18 months a qualified service professional should clean the dryer cabinet interior, lint screen housing and exhaust duct. These areas can collect lint and dust over time. An excessive amount of lint build-up could result in inefficient drying and possible fire hazard. Outside • Clean the dryer cabinet with mild soap and water. Never use harsh, gritty or abrasive cleansers. • If the cabinet becomes stained, clean with diluted chlorine bleach (1 part bleach to 8 parts water). Rinse several times with clear water. • Remove glue residue from tape or labels with a mixture of warm water and mild detergent. Or, touch residue with the sticky side of the tape or label. 3. Gently clean the lint from the filter.
-
 1
1 -
2
-
3
-
4
-
5
-
6
-
7
-
8
-
9
-
10
-
11
-
12
-
13
-
14
-
15
-
16
-
17
-
18
-
19
-
20
-
21
-
22
-
23
-
24
-
25
-
26
-
27
-
28
-
29
-
30
-
31
-
32
-
33
-
34
-
35
-
 36
36 -
 37
37 -
 38
38 -
 39
39 -
 40
40 -
 41
41 -
 42
42 -
 43
43 -
 44
44 -
 45
45 -
 46
46 -
47
-
48
 |
 |
