Epson 4000 Service Manual - Page 237
Paper Select < + Paper Feed
 |
UPC - 010343848337
View all Epson 4000 manuals
Add to My Manuals
Save this manual to your list of manuals |
Page 237 highlights
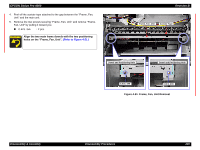
EPSON Stylus Pro 4000 5. Enter Maintenance Mode 2 (panel display: "SELF TESTING") Power OFF → Press "Paper Select (
-
 1
1 -
2
-
3
-
4
-
5
-
6
-
7
-
8
-
9
-
10
-
11
-
12
-
13
-
14
-
15
-
16
-
17
-
18
-
19
-
20
-
21
-
22
-
23
-
24
-
25
-
26
-
27
-
28
-
29
-
30
-
31
-
32
-
33
-
34
-
35
-
36
-
37
-
38
-
39
-
40
-
41
-
42
-
43
-
44
-
45
-
46
-
47
-
48
-
49
-
50
-
51
-
52
-
53
-
54
-
55
-
56
-
57
-
58
-
59
-
60
-
61
-
62
-
63
-
64
-
65
-
66
-
67
-
68
-
69
-
70
-
71
-
72
-
73
-
74
-
75
-
76
-
77
-
78
-
79
-
80
-
81
-
82
-
83
-
84
-
85
-
86
-
87
-
88
-
89
-
90
-
91
-
92
-
93
-
94
-
95
-
96
-
97
-
98
-
99
-
100
-
101
-
102
-
103
-
104
-
105
-
106
-
107
-
108
-
109
-
110
-
111
-
112
-
113
-
114
-
115
-
116
-
117
-
118
-
119
-
120
-
121
-
122
-
123
-
124
-
125
-
126
-
127
-
128
-
129
-
130
-
131
-
132
-
133
-
134
-
135
-
136
-
137
-
138
-
139
-
140
-
141
-
142
-
143
-
144
-
145
-
146
-
147
-
148
-
149
-
150
-
151
-
152
-
153
-
154
-
155
-
156
-
157
-
158
-
159
-
160
-
161
-
162
-
163
-
164
-
165
-
166
-
167
-
168
-
169
-
170
-
171
-
172
-
173
-
174
-
175
-
176
-
177
-
178
-
179
-
180
-
181
-
182
-
183
-
184
-
185
-
186
-
187
-
188
-
189
-
190
-
191
-
192
-
193
-
194
-
195
-
196
-
197
-
198
-
199
-
200
-
201
-
202
-
203
-
204
-
205
-
206
-
207
-
208
-
209
-
210
-
211
-
212
-
213
-
214
-
215
-
216
-
217
-
218
-
219
-
220
-
221
-
222
-
223
-
224
-
225
-
226
-
227
-
228
-
229
-
230
-
231
-
 232
232 -
 233
233 -
 234
234 -
 235
235 -
 236
236 -
 237
237 -
 238
238 -
 239
239 -
 240
240 -
 241
241 -
 242
242 -
243
-
244
-
245
-
246
-
247
-
248
-
249
-
250
-
251
-
252
-
253
-
254
-
255
-
256
-
257
-
258
-
259
-
260
-
261
-
262
-
263
-
264
-
265
-
266
-
267
-
268
-
269
-
270
-
271
-
272
-
273
-
274
-
275
-
276
-
277
-
278
-
279
-
280
-
281
-
282
-
283
-
284
-
285
-
286
-
287
-
288
-
289
-
290
-
291
-
292
-
293
-
294
-
295
-
296
-
297
-
298
-
299
-
300
-
301
-
302
-
303
-
304
-
305
-
306
-
307
-
308
-
309
-
310
-
311
-
312
-
313
-
314
-
315
-
316
-
317
-
318
-
319
-
320
-
321
-
322
-
323
-
324
-
325
-
326
-
327
-
328
-
329
-
330
-
331
-
332
-
333
-
334
-
335
-
336
-
337
-
338
-
339
-
340
-
341
-
342
-
343
-
344
-
345
-
346
-
347
-
348
-
349
-
350
-
351
-
352
-
353
-
354
-
355
-
356
-
357
-
358
-
359
-
360
-
361
-
362
-
363
-
364
-
365
-
366
-
367
-
368
-
369
-
370
-
371
-
372
-
373
-
374
-
375
-
376
-
377
-
378
-
379
-
380
-
381
-
382
-
383
-
384
-
385
-
386
-
387
-
388
-
389
-
390
-
391
-
392
-
393
-
394
-
395
-
396
-
397
-
398
-
399
-
400
-
401
-
402
-
403
-
404
-
405
-
406
-
407
-
408
-
409
-
410
-
411
-
412
-
413
-
414
-
415
-
416
-
417
-
418
-
419
-
420
-
421
-
422
-
423
-
424
-
425
-
426
-
427
-
428
-
429
-
430
-
431
-
432
-
433
-
434
-
435
-
436
-
437
-
438
-
439
-
440
-
441
-
442
-
443
-
444
-
445
-
446
-
447
-
448
-
449
-
450
-
451
-
452
-
453
-
454
-
455
-
456
-
457
-
458
-
459
-
460
-
461
-
462
-
463
-
464
 |
 |
EPSON Stylus Pro 4000
Revision B
Disassembly & Assembly
Disassembly Procedures
237
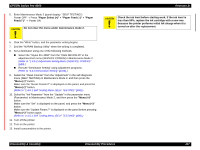
5.
Enter Maintenance Mode 2 (panel display: "SELF TESTING")
Power OFF
→
Press
"Paper Select (<)" + "Paper Feed (
∆
)" + "Paper
Feed (
∇
)"
→
Power ON
6.
Click the “Write” button, and the parameter writing begins.
7.
End the "NVRAM Backup Utility" when the writing is completed.
8.
Set a destinaton using one of the following methods.
Select the "Stylus Pro 4000" from the "CHG DEVICE-ID" in the
adjustment/set menu (SERVICE CONFIG) in Maintenance Mode 2.
(Refer to "1.4.6.2 Adjustment Setting Menu (SERVICE CONFIG)"
(p89).)
Execute "Destinaton Setting" using adjustment programs.
(Refer to "5.4.3 Destination Setting" (p416).)
9.
Select the "Clean Counter" from the "Adjustment" in the self-diagnosis
menu (SELF TESTING) in Maintenance Mode 2, and then press the
"Menu (<)"
button.
Make sure the "Reset Counter?" is displayed on the panel, and press the
"Menu (<)"
bottun.
(Refer to "1.4.6.1 Self Testing Menu (SELF TESTING)" (p80).)
10.
Select the "Ink Parameter" from the "Update" in the parameter menu
(Parrameter) in Maintenance Mode 2, and then press the
"Menu (<)"
button.
Make sure the "Set" is displayed on the panel, and press the
"Menu (<)"
button.
Make sure the "Update Param.?" is displayed on the panel before pressing
"Menu (<)"
button again.
(Refer to "1.4.6.1 Self Testing Menu (SELF TESTING)" (p80).)
11.
Turn off the printer.
12.
Turn on the printer.
13.
Install consumables to the printer.
C
A
U
T
I
O
N
Do not enter the menu under maintenance mode 2.
C
A
U
T
I
O
N
Check the ink level before starting work. If the ink level is
less than 50%, replace the ink cartridge with a new one.
Because the printer performs initial Ink charge when it is
turned on after the replacement.