Epson 4900 Managing Color Guide Windows 7 and Windows 8 Mac OS X 10.7 and 10.8 - Page 11
Printing Your Color-Managed Photo, You see a window like this one
 |
View all Epson 4900 manuals
Add to My Manuals
Save this manual to your list of manuals |
Page 11 highlights
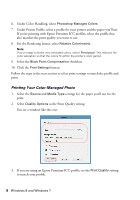
8. For the Rendering Intent, select Relative Colorimetric. Note: If your image contains very saturated colors, select Perceptual. This reduces the color saturation so that the colors fit within the printer's color gamut. 9. Select the Black Point Compensation checkbox. 10. Click the Print Settings button. Follow the steps in the next section to select print settings to match the profile and print. Printing Your Color-Managed Photo 1. Select the Source and Media Type settings for the paper you'll use for the print. 2. Select Quality Options as the Print Quality setting. You see a window like this one: 3. If you are using an Epson Premium ICC profile, set the Print Quality setting to match your profile. 4. Turn off the High Speed and Edge Smoothing options, if they are available, then click OK to close the Quality Options window. Printing with Adobe Photoshop CS5 11
-
 1
1 -
2
-
3
-
4
-
5
-
 6
6 -
 7
7 -
 8
8 -
 9
9 -
 10
10 -
 11
11 -
 12
12 -
 13
13 -
 14
14 -
 15
15 -
 16
16 -
17
-
18
-
19
-
20
-
21
-
22
-
23
-
24
-
25
-
26
-
27
-
28
-
29
-
30
-
31
-
32
-
33
-
34
 |
 |
