Epson ActionNote 880C User Manual - Page 87
Upgrading the Microprocessor, Connection or your Authorized EPSON Servicer to make sure
 |
View all Epson ActionNote 880C manuals
Add to My Manuals
Save this manual to your list of manuals |
Page 87 highlights
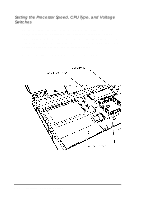
4. If you are finished installing internal components, replace the keyboard as described on pages 4-15 to 4-16. 5. Run the Setup program, as described in Chapter 1, to make sure your computer recognizes the new memory configuration. (As soon as you turn on the computer, it will prompt you to run Setup because of the memory size mismatch.) If you later remove or change the memory module, be sure to run the Setup program again. Upgrading the Microprocessor You can upgrade your computer by installing a higherperformance microprocessor. The PGA (pin grid array) socket on the computer's main board can accept both a processor on a daughterboard and a processor installed directly in the socket. A processor on a daughterboard may include 256KB of external cache; all supported processors include 8KB of internal cache. Contact your nearest computer dealer for information on obtaining a new microprocessor. Before you purchase a new microprocessor, call the EPSON Connection or your Authorized EPSON Servicer to make sure the processor can be used in your ActionNote. The following table lists the speed and voltage of some of the microprocessors you can install. If your processor is not on the list, see the documentation that came with the processor for information about its voltage and operating speed. Microprocessor upgrades Supply Voltage Microprocessor (V) Intel DX4/75 3.3 Intel DX4/100 3.3 Cx486DX2-V80 4.0 Internal External frequency (MHz) frequency (MHz) 75 25 100 33 80 40 4-18 Installing Optional Devices
-
 1
1 -
2
-
3
-
4
-
5
-
6
-
7
-
8
-
9
-
10
-
11
-
12
-
13
-
14
-
15
-
16
-
17
-
18
-
19
-
20
-
21
-
22
-
23
-
24
-
25
-
26
-
27
-
28
-
29
-
30
-
31
-
32
-
33
-
34
-
35
-
36
-
37
-
38
-
39
-
40
-
41
-
42
-
43
-
44
-
45
-
46
-
47
-
48
-
49
-
50
-
51
-
52
-
53
-
54
-
55
-
56
-
57
-
58
-
59
-
60
-
61
-
62
-
63
-
64
-
65
-
66
-
67
-
68
-
69
-
70
-
71
-
72
-
73
-
74
-
75
-
76
-
77
-
78
-
79
-
80
-
81
-
 82
82 -
 83
83 -
 84
84 -
 85
85 -
 86
86 -
 87
87 -
 88
88 -
 89
89 -
 90
90 -
 91
91 -
 92
92 -
93
-
94
-
95
-
96
-
97
-
98
-
99
-
100
-
101
-
102
-
103
-
104
-
105
-
106
-
107
-
108
-
109
-
110
-
111
-
112
-
113
-
114
-
115
-
116
-
117
-
118
-
119
-
120
-
121
-
122
-
123
-
124
-
125
-
126
-
127
-
128
-
129
-
130
-
131
-
132
-
133
-
134
-
135
-
136
-
137
-
138
-
139
 |
 |
