Epson C11CA03151 User's Guide - Page 33
Printer Settings for Mac OS X 10.5, Draft, Text & Image, Portrait, Landscape
 |
UPC - 010343870055
View all Epson C11CA03151 manuals
Add to My Manuals
Save this manual to your list of manuals |
Page 33 highlights
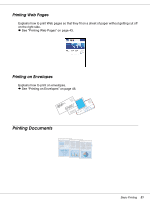
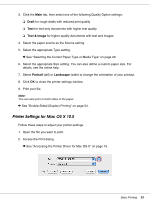
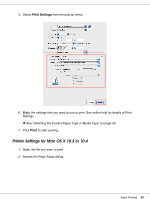
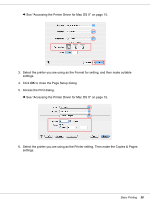
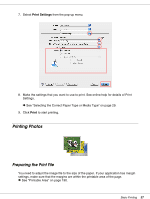
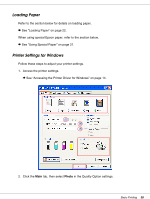
3. Click the Main tab, then select one of the following Quality Option settings: ❏ Draft for rough drafts with reduced print quality ❏ Text for text-only documents with higher text quality ❏ Text & Image for higher quality documents with text and images 4. Select the paper source as the Source setting. 5. Select the appropriate Type setting. & See "Selecting the Correct Paper Type or Media Type" on page 29. 6. Select the appropriate Size setting. You can also define a custom paper size. For details, see the online help. 7. Select Portrait (tall) or Landscape (wide) to change the orientation of your printout. 8. Click OK to close the printer settings window. 9. Print your file. Note: You can also print on both sides of the paper. & See "Double-Sided (Duplex) Printing" on page 54. Printer Settings for Mac OS X 10.5 Follow these steps to adjust your printer settings. 1. Open the file you want to print. 2. Access the Print dialog. & See "Accessing the Printer Driver for Mac OS X" on page 15. Basic Printing 33
-
 1
1 -
2
-
3
-
4
-
5
-
6
-
7
-
8
-
9
-
10
-
11
-
12
-
13
-
14
-
15
-
16
-
17
-
18
-
19
-
20
-
21
-
22
-
23
-
24
-
25
-
26
-
27
-
 28
28 -
 29
29 -
 30
30 -
 31
31 -
 32
32 -
 33
33 -
 34
34 -
 35
35 -
 36
36 -
 37
37 -
 38
38 -
39
-
40
-
41
-
42
-
43
-
44
-
45
-
46
-
47
-
48
-
49
-
50
-
51
-
52
-
53
-
54
-
55
-
56
-
57
-
58
-
59
-
60
-
61
-
62
-
63
-
64
-
65
-
66
-
67
-
68
-
69
-
70
-
71
-
72
-
73
-
74
-
75
-
76
-
77
-
78
-
79
-
80
-
81
-
82
-
83
-
84
-
85
-
86
-
87
-
88
-
89
-
90
-
91
-
92
-
93
-
94
-
95
-
96
-
97
-
98
-
99
-
100
-
101
-
102
-
103
-
104
-
105
-
106
-
107
-
108
-
109
-
110
-
111
-
112
-
113
-
114
-
115
-
116
-
117
-
118
-
119
-
120
-
121
-
122
-
123
-
124
-
125
-
126
-
127
-
128
-
129
-
130
-
131
-
132
-
133
-
134
-
135
-
136
-
137
-
138
-
139
-
140
-
141
-
142
-
143
-
144
-
145
-
146
-
147
-
148
-
149
-
150
-
151
-
152
-
153
-
154
-
155
-
156
-
157
-
158
-
159
-
160
-
161
-
162
-
163
-
164
-
165
-
166
-
167
-
168
-
169
-
170
-
171
-
172
-
173
-
174
-
175
-
176
-
177
-
178
-
179
-
180
-
181
-
182
-
183
-
184
-
185
-
186
-
187
-
188
-
189
-
190
-
191
-
192
-
193
-
194
-
195
-
196
-
197
-
198
-
199
-
200
-
201
 |
 |
