Epson C7500 Technical Reference Guide - Page 133
ecCode, The selec, ed 2D symbol fo, s saved a, he fo, s added, Recomme, ded val, he mod, le o, e 134
 |
View all Epson C7500 manuals
Add to My Manuals
Save this manual to your list of manuals |
Page 133 highlights
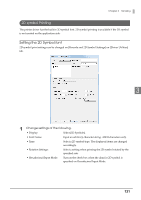
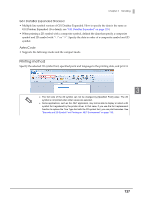
Chapter 3 Handling • GS1 DataBar Module: Sets the module width for GS1 DataBar. "Recommended value of the module" on page 134 for the recommended value. Number of Characters: Sets the maximum width for GS1 DataBar. Set when GS1 DataBar Expanded Stacked is selected for the 2D symbol. • AztecCode Type: Select a mode for AztecCode. Cell Size: Select the width of cell (module) for AztecCode. "Recommended value of the module" on page 134 for the recommended value. Number of Layers: Select the number of layers for AztecCode. [Minimize]: Optimize the minimum number of layers automatically. [Specify the Size]: Change the number of layers specified by the value in the input box. Error Correction Area: Specify the error correction area of AztecCode using of either the follow- ing. The data can be read even if the part of the symbol is broken, and res- toration ratio becomes higher for bigger numbers. [Auto]:Default value is 23%+3 code words. [Specify a Percentage]: Specify the error correction area with a percentage 3 value in the input box. • DataMatrix Symbol Shape: Set when "Rectangle" is selected for the sample shape of DataMatrix. Error Correction Level: Select an error correction level for DataMatrix. Cell Size: Select the width of cell (module) for DataMatrix. "Recommended value of the module" on page 134 for the recommended value. Number of Vertical Cells: Specify the number of cells for DataMatrix in the vertical direction. Set when "Rectangle" is selected for the sample shape of DataMatrix. Number of Horizontal Cells: Specify the number of cells for DataMatrix in the horizontal direction. Set when "Rectangle" is selected for the sample shape of DataMatrix. [Minimize]: Optimize the minimum number of cells automatically. [Specify the Size]: Change settings to the selected size. 3 Click [Add]. The selected 2D symbol font is saved and the font name is added to the font list. The 2D symbol font can be registered up to 30. The 2D symbol font setting can be overwritten by clicking [Save] after selecting the font name from the font list and changing the setting. The 2D symbol font setting can be deleted by clicking [Delete] after selecting the font name from the font list. 133
-
 1
1 -
2
-
3
-
4
-
5
-
6
-
7
-
8
-
9
-
10
-
11
-
12
-
13
-
14
-
15
-
16
-
17
-
18
-
19
-
20
-
21
-
22
-
23
-
24
-
25
-
26
-
27
-
28
-
29
-
30
-
31
-
32
-
33
-
34
-
35
-
36
-
37
-
38
-
39
-
40
-
41
-
42
-
43
-
44
-
45
-
46
-
47
-
48
-
49
-
50
-
51
-
52
-
53
-
54
-
55
-
56
-
57
-
58
-
59
-
60
-
61
-
62
-
63
-
64
-
65
-
66
-
67
-
68
-
69
-
70
-
71
-
72
-
73
-
74
-
75
-
76
-
77
-
78
-
79
-
80
-
81
-
82
-
83
-
84
-
85
-
86
-
87
-
88
-
89
-
90
-
91
-
92
-
93
-
94
-
95
-
96
-
97
-
98
-
99
-
100
-
101
-
102
-
103
-
104
-
105
-
106
-
107
-
108
-
109
-
110
-
111
-
112
-
113
-
114
-
115
-
116
-
117
-
118
-
119
-
120
-
121
-
122
-
123
-
124
-
125
-
126
-
127
-
 128
128 -
 129
129 -
 130
130 -
 131
131 -
 132
132 -
 133
133 -
 134
134 -
 135
135 -
 136
136 -
 137
137 -
 138
138 -
139
-
140
-
141
-
142
-
143
-
144
-
145
-
146
-
147
-
148
-
149
-
150
-
151
-
152
-
153
-
154
-
155
-
156
-
157
-
158
-
159
-
160
-
161
-
162
-
163
-
164
-
165
-
166
-
167
-
168
-
169
-
170
-
171
-
172
-
173
-
174
-
175
-
176
-
177
-
178
-
179
-
180
-
181
-
182
-
183
-
184
-
185
-
186
-
187
-
188
-
189
-
190
-
191
-
192
-
193
-
194
-
195
-
196
-
197
-
198
-
199
-
200
-
201
-
202
-
203
-
204
-
205
-
206
-
207
-
208
-
209
-
210
-
211
-
212
-
213
-
214
-
215
-
216
-
217
-
218
-
219
-
220
-
221
-
222
-
223
-
224
 |
 |