Epson CX9400Fax Quick Reference Guide - Page 14
Setting Up Fax Features - user s guide
 |
UPC - 010343865815
View all Epson CX9400Fax manuals
Add to My Manuals
Save this manual to your list of manuals |
Page 14 highlights
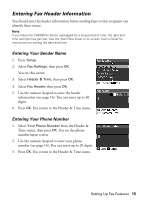
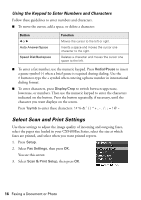
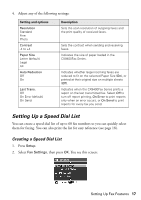
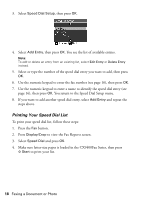
2. To use a telephone or answering machine, you need a second phone cable. Connect one end of the cable to the telephone or answering machine, and connect the other end to the EXT. port on the back of the CX9400Fax Series (or to another wall jack on the same line). If your answering machine is set to pick up on the fourth ring, you should set the CX9400Fax Series to pick up on the fifth ring or later: 1. Press Setup. 2. Select Fax Settings, then press OK. 3. Select Communication, then press OK. 4. Select Rings to Answer, then press r. 5. Select the number of rings, then press OK. Select more than the number of rings needed for the answering machine to pick up. When you receive a call, if the other party is a fax and you pick up the phone or the answering machine answers, the CX9400Fax Series automatically begins receiving the transmission. If the other party is a caller, the phone can be used as normal or a message can be left on the answering machine. Setting Up Fax Features Before sending or receiving faxes, you may want to create a fax header, select your fax preferences, and set up a speed dial list of frequently used fax numbers. ■ "Entering Fax Header Information" on page 15 ■ "Select Scan and Print Settings" on page 16 ■ "Setting Up a Speed Dial List" on page 17 Note: To change other settings or print fax reports, see the on-screen User's Guide. To turn off the "beep" heard when you press a button, press Setup, select Maintenance, choose Beep, and select Off. 14 Faxing a Document or Photo
-
 1
1 -
2
-
3
-
4
-
5
-
6
-
7
-
8
-
 9
9 -
 10
10 -
 11
11 -
 12
12 -
 13
13 -
 14
14 -
 15
15 -
 16
16 -
 17
17 -
 18
18 -
 19
19 -
20
-
21
-
22
-
23
-
24
-
25
-
26
-
27
-
28
-
29
-
30
-
31
-
32
-
33
-
34
-
35
-
36
-
37
-
38
-
39
-
40
-
41
-
42
-
43
-
44
-
45
-
46
-
47
-
48
-
49
-
50
-
51
-
52
 |
 |