Epson ColorPage 8000 User Setup Information - Page 18
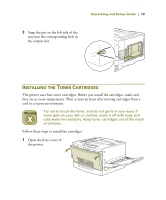
INSTALLING THE PHOTOCONDUCTOR UNIT, Follow these steps to install the photoconductor unit
 |
View all Epson ColorPage 8000 manuals
Add to My Manuals
Save this manual to your list of manuals |
Page 18 highlights
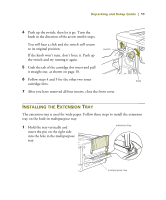
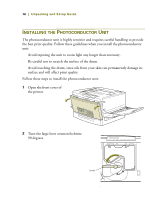
16 | Unpacking and Setup Guide INSTALLING THE PHOTOCONDUCTOR UNIT The photoconductor unit is highly sensitive and requires careful handling to provide the best print quality. Follow these guidelines when you install the photoconductor unit: s Avoid exposing the unit to room light any longer than necessary. s Be careful not to scratch the surface of the drum. s Avoid touching the drum, since oils from your skin can permanently damage its surface and will affect print quality. Follow these steps to install the photoconductor unit: 1 Open the front cover of the printer. 2 Turn the large lever counterclockwise 90 degrees. lever
-
 1
1 -
2
-
3
-
4
-
5
-
6
-
7
-
8
-
9
-
10
-
11
-
12
-
 13
13 -
 14
14 -
 15
15 -
 16
16 -
 17
17 -
 18
18 -
 19
19 -
 20
20 -
 21
21 -
 22
22 -
 23
23 -
24
-
25
-
26
-
27
-
28
-
29
-
30
 |
 |

16
|
Unpacking and Setup Guide
I
NSTALLING
THE
P
HOTOCONDUCTOR
U
NIT
The photoconductor unit is highly sensitive and requires careful handling to provide
the best print quality. Follow these guidelines when you install the photoconductor
unit:
■
Avoid exposing the unit to room light any longer than necessary.
■
Be careful not to scratch the surface of the drum.
■
Avoid touching the drum, since oils from your skin can permanently damage its
surface and will affect print quality.
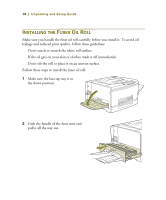
Follow these steps to install the photoconductor unit:
1
Open the front cover of
the printer.
2
Turn the large lever counterclockwise
90 degrees.
lever