Epson ColorPage 8000 User Setup Information - Page 19
Then carefully slide it all the, Turn the small lever on
 |
View all Epson ColorPage 8000 manuals
Add to My Manuals
Save this manual to your list of manuals |
Page 19 highlights
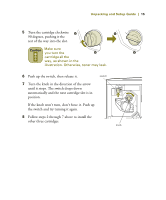
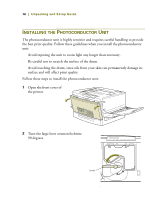
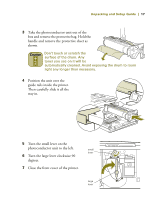
Unpacking and Setup Guide | 17 3 Take the photoconductor unit out of the box and remove the protective bag. Hold the handle and remove the protective sheet as shown. Don't touch or scratch the surface of the drum. Any toner you see on it will be automatically cleaned. Avoid exposing the drum to room light any longer than necessary. 4 Position the unit over the guide rails inside the printer. Then carefully slide it all the way in. 5 Turn the small lever on the photoconductor unit to the left. 6 Turn the large lever clockwise 90 degrees. 7 Close the front cover of the printer. sAmDallD lAevRerROW large lever
-
 1
1 -
2
-
3
-
4
-
5
-
6
-
7
-
8
-
9
-
10
-
11
-
12
-
13
-
 14
14 -
 15
15 -
 16
16 -
 17
17 -
 18
18 -
 19
19 -
 20
20 -
 21
21 -
 22
22 -
 23
23 -
 24
24 -
25
-
26
-
27
-
28
-
29
-
30
 |
 |

Unpacking and Setup Guide
|
17
3
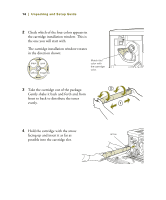
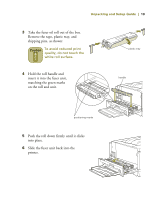
Take the photoconductor unit out of the
box and remove the protective bag. Hold the
handle and remove the protective sheet as
shown.
Don’t touch or scratch the
surface of the drum. Any
toner you see on it will be
automatically cleaned. Avoid exposing the drum to room
light any longer than necessary.
4
Position the unit over the
guide rails inside the printer.
Then carefully slide it all the
way in.
5
Turn the small lever on the
photoconductor unit to the left.
6
Turn the large lever clockwise 90
degrees.
7
Close the front cover of the printer.
ADD
ARROW
small
lever
large
lever