Epson DS-1630 Users Guide - Page 56
Saving a Scan as an Office Format File - Windows, Parent topic, Windows 10, All Apps, Epson Software
 |
View all Epson DS-1630 manuals
Add to My Manuals
Save this manual to your list of manuals |
Page 56 highlights
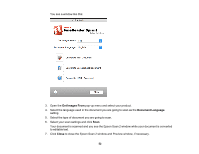
4. Click Scan. You see a preview of your scan in the Document Capture Pro or Document Capture window. 5. Click one of the cloud service Destination icons to choose where to save your scanned file. (If you cannot see all of the icons below, the service software may not be installed, the service may not be available on your platform, or you need to click the arrow next to the icons.) • Web Folder (WebDAV) • Microsoft SharePoint server (Windows only) • Evernote (Windows only) • Google Drive • SugarSync You see the Transfer Settings window. 6. Enter any required information to set up the destination. If you have previously created a saved setting for the destination, select it from the drop-down list. 7. Adjust any save settings, then click OK or Send, depending on the destination. Your originals are scanned and uploaded to the indicated server. Parent topic: Scanning Special Projects Saving a Scan as an Office Format File - Windows You can use Document Capture Pro (Windows) to save your scans in one of the following Microsoft Office file formats: Microsoft Word (.docx), Microsoft Excel (.xlsx), or Microsoft PowerPoint (.pptx). 1. Load your original in the scanner. 2. Do one of the following to start Document Capture Pro: • Windows 10: Click and select All Apps > Epson Software > Document Capture Pro. • Windows 8.x: Navigate to the Apps screen and select Document Capture Pro. • Windows (other versions): Click or Start, and select All Programs or Programs. Select EPSON Software > Document Capture Pro. 56
-
 1
1 -
2
-
3
-
4
-
5
-
6
-
7
-
8
-
9
-
10
-
11
-
12
-
13
-
14
-
15
-
16
-
17
-
18
-
19
-
20
-
21
-
22
-
23
-
24
-
25
-
26
-
27
-
28
-
29
-
30
-
31
-
32
-
33
-
34
-
35
-
36
-
37
-
38
-
39
-
40
-
41
-
42
-
43
-
44
-
45
-
46
-
47
-
48
-
49
-
50
-
 51
51 -
 52
52 -
 53
53 -
 54
54 -
 55
55 -
 56
56 -
 57
57 -
 58
58 -
 59
59 -
 60
60 -
 61
61 -
62
-
63
-
64
-
65
-
66
-
67
-
68
-
69
-
70
-
71
-
72
-
73
-
74
-
75
-
76
-
77
-
78
-
79
-
80
-
81
-
82
-
83
-
84
-
85
-
86
-
87
-
88
-
89
-
90
-
91
-
92
-
93
-
94
-
95
-
96
-
97
 |
 |
