Epson DS-40 User Manual - Page 49
Scanning to a SharePoint Server or Cloud Service
 |
View all Epson DS-40 manuals
Add to My Manuals
Save this manual to your list of manuals |
Page 49 highlights
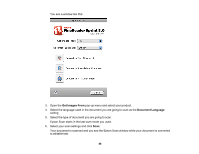
7. Click Close to close the Epson Scan window and Preview window, if necessary. You see the Save Converted File As window: 8. Click the Save button. The file is saved and then opened in an application associated with the file type you selected, if available on your system. Parent topic: Convert Scanned Documents to Editable Text (OCR) Related tasks Scanning with Epson Scan Scanning to a SharePoint Server or Cloud Service You can use Document Capture Pro (Windows) or Document Capture (OS X) to upload scanned images to a SharePoint server or a cloud service. 1. Do one of the following to start Document Capture Pro (Windows) or Document Capture (OS X): • Windows 8.x: Navigate to the Apps screen and select Document Capture Pro. • Windows (other versions): Click or Start, and select All Programs or Programs. Select EPSON Software, then select Document Capture Pro. • OS X: Open the Applications folder, select the Epson Software folder, and select Document Capture. 49
-
 1
1 -
2
-
3
-
4
-
5
-
6
-
7
-
8
-
9
-
10
-
11
-
12
-
13
-
14
-
15
-
16
-
17
-
18
-
19
-
20
-
21
-
22
-
23
-
24
-
25
-
26
-
27
-
28
-
29
-
30
-
31
-
32
-
33
-
34
-
35
-
36
-
37
-
38
-
39
-
40
-
41
-
42
-
43
-
 44
44 -
 45
45 -
 46
46 -
 47
47 -
 48
48 -
 49
49 -
 50
50 -
 51
51 -
 52
52 -
 53
53 -
 54
54 -
55
-
56
-
57
-
58
-
59
-
60
-
61
-
62
-
63
-
64
-
65
-
66
-
67
-
68
-
69
-
70
-
71
-
72
-
73
-
74
-
75
-
76
-
77
-
78
-
79
-
80
-
81
-
82
-
83
-
84
-
85
-
86
-
87
-
88
-
89
 |
 |
