Epson Expression 636 User Setup Information - PC - Page 17
SCANNING IMAGES, Destination dialog box, select the box beneath the resolution
 |
View all Epson Expression 636 manuals
Add to My Manuals
Save this manual to your list of manuals |
Page 17 highlights
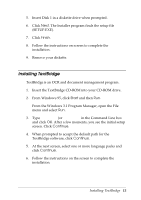
You'll select different resolutions for scanning line drawings and halftones from the ones you select for scanning photographs. The final output device is the device on which you plan to ultimately print the image. This may be a printer connected to your computer or a commercial printing press. In addition, the file size of the scanned image may determine the resolution you select. The file size may be very large for high resolution scans, taking up valuable disk space and causing longer processing and printing time. Generally, the higher the resolution you choose, the larger the file. Note that a very high resolution scan may not produce a betterquality printed image because your output device may not recognize the high resolution information stored in the file. There is no point in scanning at a higher resolution than your output device can support. To keep file sizes manageable, select the lowest resolution that provides acceptable quality on your output device. You can change resolutions using EPSON TWAIN by choosing the Destination button on the advanced screen. In the Destination dialog box, select the box beneath the resolution type you want to change (Drawing/Halftone or Photo); then choose the resolution for that type from the pull-down menu. Now that you know the basics, you're ready to begin scanning. For additional information, see the manuals for your scanner, the scanning utilities, and your software. Scanning Images Now you're ready to start scanning. First, choose an image to scan. The best choice is a color photograph. Printed pictures, such as those in magazines, do not scan as well as photographs because of the dot patterns used in the printing process. Scanning Images 15
-
 1
1 -
2
-
3
-
4
-
5
-
6
-
7
-
8
-
9
-
10
-
11
-
 12
12 -
 13
13 -
 14
14 -
 15
15 -
 16
16 -
 17
17 -
 18
18 -
 19
19 -
 20
20
 |
 |