Epson F9200 User Manual - Page 170
Setting Up the Product After Moving, Moving or Transporting the Product, Attaching the Media Guide Bar
 |
View all Epson F9200 manuals
Add to My Manuals
Save this manual to your list of manuals |
Page 170 highlights
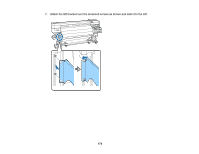
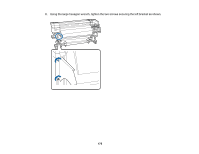
9. While supporting the bracket for the media guide bar, use the large hexagon wrench to remove the three screws securing the bracket. Then remove the bracket. Parent topic: Moving or Transporting the Product Related tasks Attaching the Media Guide Bar Setting Up the Product After Moving Follow these steps to set up the product after moving it. 1. Verify that the location is suitable for installation. 2. Reattach the media guide bar, if you removed it. 3. Perform parallel adjustment for the media feeding unit and auto take-up reel as necessary. 4. Install the waste ink bottle. 5. Connect the power cable to an electrical outlet and turn on the printer. 6. Load media in the product. 7. Perform a nozzle check and confirm that there are no clogged nozzles. 8. Align the print head and check the print quality. Parent topic: Moving or Transporting the Product Related tasks Replacing the Waste Ink Bottle Attaching the Media Guide Bar 170
-
 1
1 -
2
-
3
-
4
-
5
-
6
-
7
-
8
-
9
-
10
-
11
-
12
-
13
-
14
-
15
-
16
-
17
-
18
-
19
-
20
-
21
-
22
-
23
-
24
-
25
-
26
-
27
-
28
-
29
-
30
-
31
-
32
-
33
-
34
-
35
-
36
-
37
-
38
-
39
-
40
-
41
-
42
-
43
-
44
-
45
-
46
-
47
-
48
-
49
-
50
-
51
-
52
-
53
-
54
-
55
-
56
-
57
-
58
-
59
-
60
-
61
-
62
-
63
-
64
-
65
-
66
-
67
-
68
-
69
-
70
-
71
-
72
-
73
-
74
-
75
-
76
-
77
-
78
-
79
-
80
-
81
-
82
-
83
-
84
-
85
-
86
-
87
-
88
-
89
-
90
-
91
-
92
-
93
-
94
-
95
-
96
-
97
-
98
-
99
-
100
-
101
-
102
-
103
-
104
-
105
-
106
-
107
-
108
-
109
-
110
-
111
-
112
-
113
-
114
-
115
-
116
-
117
-
118
-
119
-
120
-
121
-
122
-
123
-
124
-
125
-
126
-
127
-
128
-
129
-
130
-
131
-
132
-
133
-
134
-
135
-
136
-
137
-
138
-
139
-
140
-
141
-
142
-
143
-
144
-
145
-
146
-
147
-
148
-
149
-
150
-
151
-
152
-
153
-
154
-
155
-
156
-
157
-
158
-
159
-
160
-
161
-
162
-
163
-
164
-
 165
165 -
 166
166 -
 167
167 -
 168
168 -
 169
169 -
 170
170 -
 171
171 -
 172
172 -
 173
173 -
 174
174 -
 175
175 -
176
-
177
-
178
-
179
-
180
-
181
-
182
-
183
-
184
-
185
-
186
-
187
-
188
-
189
-
190
-
191
-
192
-
193
-
194
-
195
-
196
-
197
-
198
-
199
-
200
-
201
-
202
-
203
-
204
-
205
-
206
-
207
-
208
-
209
-
210
-
211
-
212
-
213
-
214
-
215
-
216
-
217
-
218
-
219
-
220
-
221
-
222
-
223
-
224
-
225
-
226
-
227
-
228
-
229
-
230
-
231
-
232
-
233
-
234
-
235
-
236
-
237
-
238
-
239
-
240
-
241
-
242
-
243
 |
 |
