Epson LabelWorks LW-700 Users Guide - Page 79
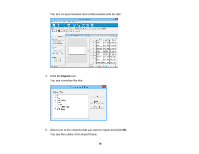
icon, enter a file name, and click, A green check mark appears next to the row number.
 |
View all Epson LabelWorks LW-700 manuals
Add to My Manuals
Save this manual to your list of manuals |
Page 79 highlights
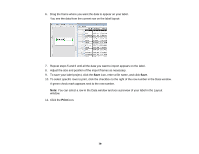
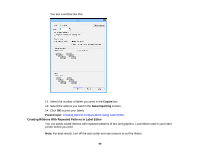
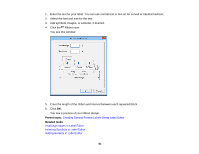
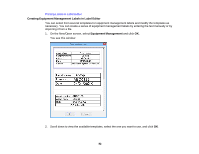
6. Drag the frame where you want the data to appear on your label. You see the data from the current row on the label layout: 7. Repeat steps 5 and 6 until all the data you want to import appears on the label. 8. Adjust the size and position of the import frames as necessary. 9. To save your label project, click the Save icon, enter a file name, and click Save. 10. To select specific rows to print, click the checkbox to the right of the row number in the Data window. A green check mark appears next to the row number. Note: You can select a row in the Data window and see a preview of your label in the Layout window. 11. Click the Print icon. 79
-
 1
1 -
2
-
3
-
4
-
5
-
6
-
7
-
8
-
9
-
10
-
11
-
12
-
13
-
14
-
15
-
16
-
17
-
18
-
19
-
20
-
21
-
22
-
23
-
24
-
25
-
26
-
27
-
28
-
29
-
30
-
31
-
32
-
33
-
34
-
35
-
36
-
37
-
38
-
39
-
40
-
41
-
42
-
43
-
44
-
45
-
46
-
47
-
48
-
49
-
50
-
51
-
52
-
53
-
54
-
55
-
56
-
57
-
58
-
59
-
60
-
61
-
62
-
63
-
64
-
65
-
66
-
67
-
68
-
69
-
70
-
71
-
72
-
73
-
 74
74 -
 75
75 -
 76
76 -
 77
77 -
 78
78 -
 79
79 -
 80
80 -
 81
81 -
 82
82 -
 83
83 -
 84
84 -
85
-
86
-
87
-
88
-
89
-
90
-
91
-
92
-
93
-
94
-
95
-
96
-
97
-
98
-
99
-
100
-
101
-
102
-
103
-
104
-
105
-
106
-
107
-
108
-
109
-
110
-
111
-
112
-
113
-
114
-
115
-
116
-
117
-
118
-
119
-
120
-
121
-
122
-
123
-
124
-
125
-
126
-
127
-
128
-
129
 |
 |

6.
Drag the frame where you want the data to appear on your label.
You see the data from the current row on the label layout:
7.
Repeat steps 5 and 6 until all the data you want to import appears on the label.
8.
Adjust the size and position of the import frames as necessary.
9.
To save your label project, click the
Save
icon, enter a file name, and click
Save
.
10. To select specific rows to print, click the checkbox to the right of the row number in the Data window.
A green check mark appears next to the row number.
Note:
You can select a row in the Data window and see a preview of your label in the Layout
window.
11. Click the
Print
icon.
79