Epson MX-70 User Manual - Page 103
but firmly to your right.
 |
View all Epson MX-70 manuals
Add to My Manuals
Save this manual to your list of manuals |
Page 103 highlights
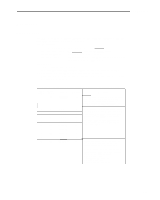
Appendix L and divide into 100,000,000. The result is the estimated print head life in days. (Then count the legs and divide by four . . .) If and when the print head needs replacement, make sure it is cool to the touch. It may operate very hot under heavy use. Remove the printer lid and ribbon cartridge. Turn the head lock lever clockwise and pull the print head straight up and off. Don't pull too far! It's still connected to the base of the printer by a flat ribbon cable. Grasp the ribbon cable (not the head connector block!) and pull gently but firmly to your right. You have just removed your first Epson print head. (Shades of the French Revolution.) To install a new print head assembly, push the new ribbon cable into the head connector, lay the print head on its mount and turn the head lock lever counterclockwise. Voila! Back in business. And it took less time than solving the Rubik cube. Print head unit Head Lock Lever Carnage Assembl (Side View) Head Cable L . _ ; . ) Terminal Board -Head Connector 106 *Take hold of the cable at the point indicated by arrows 8 and apply force In either of the directions indicated by arrow c) to push In or pull out the head cable.
-
 1
1 -
2
-
3
-
4
-
5
-
6
-
7
-
8
-
9
-
10
-
11
-
12
-
13
-
14
-
15
-
16
-
17
-
18
-
19
-
20
-
21
-
22
-
23
-
24
-
25
-
26
-
27
-
28
-
29
-
30
-
31
-
32
-
33
-
34
-
35
-
36
-
37
-
38
-
39
-
40
-
41
-
42
-
43
-
44
-
45
-
46
-
47
-
48
-
49
-
50
-
51
-
52
-
53
-
54
-
55
-
56
-
57
-
58
-
59
-
60
-
61
-
62
-
63
-
64
-
65
-
66
-
67
-
68
-
69
-
70
-
71
-
72
-
73
-
74
-
75
-
76
-
77
-
78
-
79
-
80
-
81
-
82
-
83
-
84
-
85
-
86
-
87
-
88
-
89
-
90
-
91
-
92
-
93
-
94
-
95
-
96
-
97
-
 98
98 -
 99
99 -
 100
100 -
 101
101 -
 102
102 -
 103
103 -
 104
104 -
 105
105 -
 106
106 -
 107
107
 |
 |
