Epson P400 Basics and warranty - Page 8
Insert one sheet of paper, printable side up and against the right side, then
 |
View all Epson P400 manuals
Add to My Manuals
Save this manual to your list of manuals |
Page 8 highlights
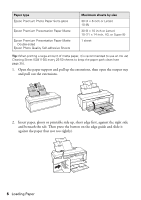
5. Attach the single sheet guide by aligning the notches on its base with the slots on the back of the printer. Then hook the tabs over the top of the slot (marked with orange triangles). 6. Make sure the printer is on so it can load the paper correctly. 7. Insert one sheet of paper, printable side up and against the right side, then align the edge guide so that the edges of the paper are flush and straight along both sides. Note: Load paper short edge first, no matter which way your photo faces. Check the paper package for any additional loading instructions. 8 Loading Paper
-
 1
1 -
2
-
 3
3 -
 4
4 -
 5
5 -
 6
6 -
 7
7 -
 8
8 -
 9
9 -
 10
10 -
 11
11 -
 12
12 -
 13
13 -
14
-
15
-
16
-
17
-
18
-
19
-
20
-
21
-
22
-
23
-
24
-
25
-
26
-
27
-
28
-
29
-
30
-
31
-
32
-
33
-
34
-
35
-
36
-
37
-
38
-
39
-
40
-
41
-
42
-
43
-
44
-
45
-
46
-
47
-
48
-
49
-
50
-
51
-
52
 |
 |
8
Loading Paper
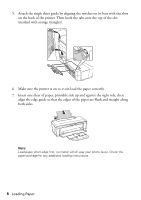
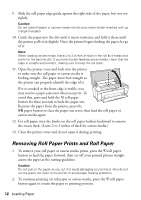
5.
Attach the single sheet guide by aligning the notches on its base with the slots
on the back of the printer. Then hook the tabs over the top of the slot
(marked with orange triangles).
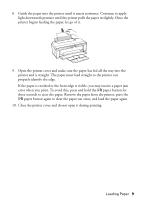
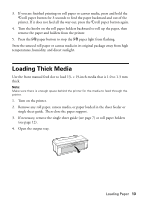
6.
Make sure the printer is on so it can load the paper correctly.
7.
Insert one sheet of paper, printable side up and against the right side, then
align the edge guide so that the edges of the paper are flush and straight along
both sides.
Note:
Load paper short edge first, no matter which way your photo faces. Check the
paper package for any additional loading instructions.