Epson PowerLite 7200 User Manual - Page 104
Launching the Software on a Macintosh, Using the Software
 |
View all Epson PowerLite 7200 manuals
Add to My Manuals
Save this manual to your list of manuals |
Page 104 highlights
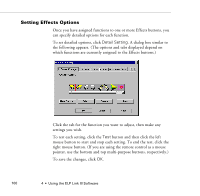
Launching the Software on a Macintosh 1. Open the ELPLink3 folder. 2. Double-click the ELPLink3 icon. ELP Link III launches and three menus-File, Option, and Help-appear at the top of the screen. If you're launching ELP Link III for the first time, select COM Port from the Option menu, then choose either the printer or modem port (whichever port you connected the serial cable to). Then open the Option menu and select Property Setting to display the ELP Link III main window. Using the Software The ELP Link III software can be used to: q Customize the remote control Effects buttons q Control standard and special projector features Note: If you ever select Unconnected and Execute from the Option menu, always uncheck the setting before exiting ELP Link III so the program starts correctly the next time you use it. Customizing the Remote Control Effects Buttons You can assign functions to the remote control Effects buttons so you can use them to perform special operations, such as drawing shapes on the projected image or changing the cursor shape. You customize the Effects buttons from the ELP Link III main dialog box. 96 4 • Using the ELP Link III Software
-
 1
1 -
2
-
3
-
4
-
5
-
6
-
7
-
8
-
9
-
10
-
11
-
12
-
13
-
14
-
15
-
16
-
17
-
18
-
19
-
20
-
21
-
22
-
23
-
24
-
25
-
26
-
27
-
28
-
29
-
30
-
31
-
32
-
33
-
34
-
35
-
36
-
37
-
38
-
39
-
40
-
41
-
42
-
43
-
44
-
45
-
46
-
47
-
48
-
49
-
50
-
51
-
52
-
53
-
54
-
55
-
56
-
57
-
58
-
59
-
60
-
61
-
62
-
63
-
64
-
65
-
66
-
67
-
68
-
69
-
70
-
71
-
72
-
73
-
74
-
75
-
76
-
77
-
78
-
79
-
80
-
81
-
82
-
83
-
84
-
85
-
86
-
87
-
88
-
89
-
90
-
91
-
92
-
93
-
94
-
95
-
96
-
97
-
98
-
 99
99 -
 100
100 -
 101
101 -
 102
102 -
 103
103 -
 104
104 -
 105
105 -
 106
106 -
 107
107 -
 108
108 -
 109
109 -
110
-
111
-
112
-
113
-
114
-
115
-
116
-
117
-
118
-
119
-
120
-
121
-
122
-
123
-
124
-
125
-
126
-
127
-
128
-
129
-
130
-
131
-
132
-
133
-
134
-
135
-
136
-
137
-
138
-
139
-
140
-
141
-
142
-
143
-
144
-
145
-
146
-
147
-
148
-
149
-
150
-
151
-
152
-
153
-
154
 |
 |
