Epson PowerLite 9100i User Manual - Page 27
Connecting the Video Cable
 |
View all Epson PowerLite 9100i manuals
Add to My Manuals
Save this manual to your list of manuals |
Page 27 highlights
Connecting the Video Cable 1. Connect one end of the computer video cable to the projector's Computer 1 (VGA) port. Computer 1 (VGA) port computer video cable 2. Make sure the DVI/VGA DVI/VGA switch (slide to right) switch on the back panel is flipped to the right, as shown. Computer 1 If necessary, use the tip of a Computer 2 /Component Video ballpoint pen to slide it over. R/Cr/Pr G/Y B/Cb/Pb H/C Sync V Sync 3. Connect the other end of the video cable to the laptop's video (monitor) port. 4. Tighten the screws on the connectors. If you don't need to make any other connections, you can plug in your projector and turn it on. See page 39 for instructions. Setting Up the Projector 21
-
 1
1 -
2
-
3
-
4
-
5
-
6
-
7
-
8
-
9
-
10
-
11
-
12
-
13
-
14
-
15
-
16
-
17
-
18
-
19
-
20
-
21
-
 22
22 -
 23
23 -
 24
24 -
 25
25 -
 26
26 -
 27
27 -
 28
28 -
 29
29 -
 30
30 -
 31
31 -
 32
32 -
33
-
34
-
35
-
36
-
37
-
38
-
39
-
40
-
41
-
42
-
43
-
44
-
45
-
46
-
47
-
48
-
49
-
50
-
51
-
52
-
53
-
54
-
55
-
56
-
57
-
58
-
59
-
60
-
61
-
62
-
63
-
64
-
65
-
66
-
67
-
68
-
69
-
70
-
71
-
72
-
73
-
74
-
75
-
76
-
77
-
78
-
79
-
80
-
81
-
82
-
83
-
84
-
85
-
86
-
87
-
88
-
89
-
90
-
91
-
92
-
93
-
94
-
95
-
96
-
97
-
98
-
99
-
100
-
101
-
102
-
103
-
104
-
105
-
106
-
107
-
108
-
109
-
110
-
111
-
112
-
113
-
114
-
115
-
116
-
117
-
118
-
119
-
120
-
121
-
122
 |
 |

Setting Up the Projector
21
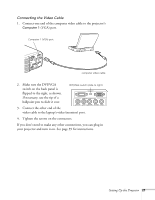
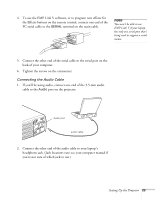
Connecting the Video Cable
1.
Connect one end of the computer video cable to the projector’s
Computer 1
(VGA) port.
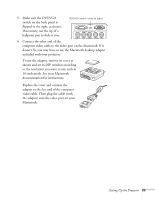
2.
Make sure the DVI/VGA
switch on the back panel is
flipped to the right, as shown.
If necessary, use the tip of a
ballpoint pen to slide it over.
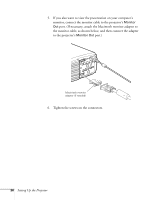
3.
Connect the other end of the
video cable to the laptop’s video (monitor) port.
4.
Tighten the screws on the connectors.
If you don’t need to make any other connections, you can plug in
your projector and turn it on. See page 39 for instructions.
Computer 1 (VGA) port
computer video cable
Computer 2 /
Component Video
Computer 1
R/Cr/Pr
B/Cb/Pb
H/C Sync
V Sync
G/Y
DVI/VGA switch (slide to right)