Epson R300 User Manual - Page 18
Using Your Camera’s Print Settings, Using PRINT Image Matching, Using DPOF or PictBridge
 |
UPC - 010343848818
View all Epson R300 manuals
Add to My Manuals
Save this manual to your list of manuals |
Page 18 highlights
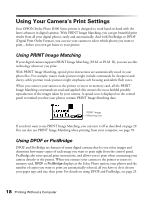
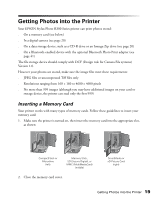
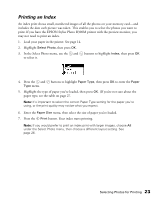
Using Your Camera's Print Settings Your EPSON Stylus Photo R300 Series printer is designed to work hand-in-hand with the latest advances in digital cameras. With PRINT Image Matching, you can get beautiful print results from all your digital photos, easily and automatically. And with PictBridge or DPOF (Digital Print Order Format), you can use your camera to select which photos you want to print-before you even get home to your printer. Using PRINT Image Matching If your digital camera supports PRINT Image Matching (P.I.M. or P.I.M. II), you can use this technology whenever you print. With PRINT Image Matching, special print instructions are automatically saved in your photo files. For example, macro mode pictures might include commands for sharpness and clarity, while portrait mode pictures might emphasize soft focusing and subtle flesh tones. When you connect your camera to the printer or insert its memory card, all the PRINT Image Matching commands are read and applied; this ensures the most faithful possible reproduction of the images taken by your camera. A special icon is displayed on the control panel to remind you that your photos contain PRINT Image Matching data. PRINT Image Matching icon If you don't want to use PRINT Image Matching, you can turn it off as described on page 29. You can also use PRINT Image Matching when printing from your computer; see page 78. Using DPOF or PictBridge DPOF and PictBridge are features of many digital cameras that let you select images and determine how many copies of each image you want to print right from the control panel. PictBridge also saves special print instructions, and allows you to print when connecting your camera directly to the printer. When you connect your camera to the printer or insert its memory card, DPOF or PictBridge displays as the Select Photo option; your photos and the number of copies you want to print are automatically selected; all you have to do is choose your paper type and size, then print. For details on using DPOF and PictBridge, see page 25. 18 Printing Without a Computer
-
 1
1 -
2
-
3
-
4
-
5
-
6
-
7
-
8
-
9
-
10
-
11
-
12
-
 13
13 -
 14
14 -
 15
15 -
 16
16 -
 17
17 -
 18
18 -
 19
19 -
 20
20 -
 21
21 -
 22
22 -
 23
23 -
24
-
25
-
26
-
27
-
28
-
29
-
30
-
31
-
32
-
33
-
34
-
35
-
36
-
37
-
38
-
39
-
40
-
41
-
42
-
43
-
44
-
45
-
46
-
47
-
48
-
49
-
50
-
51
-
52
-
53
-
54
-
55
-
56
-
57
-
58
-
59
-
60
-
61
-
62
-
63
-
64
-
65
-
66
-
67
-
68
-
69
-
70
-
71
-
72
-
73
-
74
-
75
-
76
-
77
-
78
-
79
-
80
-
81
-
82
-
83
-
84
-
85
-
86
-
87
-
88
-
89
-
90
-
91
-
92
-
93
-
94
-
95
-
96
-
97
-
98
-
99
-
100
-
101
-
102
-
103
-
104
-
105
-
106
-
107
-
108
-
109
-
110
-
111
-
112
-
113
-
114
-
115
-
116
-
117
-
118
-
119
-
120
-
121
-
122
-
123
-
124
 |
 |
