Epson RX580 Basics Guide - Page 66
Scanning to a Memory Card - scanner instructions
 |
UPC - 010343859906
View all Epson RX580 manuals
Add to My Manuals
Save this manual to your list of manuals |
Page 66 highlights
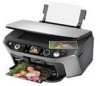
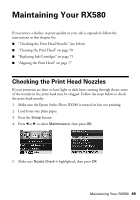
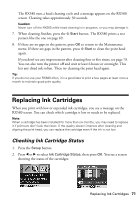
Scanning to a Memory Card You can scan and save documents or photos to a memory card in either JPEG or PDF format. First, insert your memory card following the instructions on page 22. Then follow these steps. 1. Open the document cover and place your original face-down on the glass, as described on page 64. 2. Press the Memory Card mode button. 3. Press l or r to select Scan to Memory Card, then press OK. 4. Use the u, d, l, and r buttons to select the following options: ■ Format: select JPEG (for photos) or PDF (for documents). ■ Scan Area: if the edges of the photo are light in color, select Max Area. Otherwise, select Auto Crop. ■ Original: select Text (if you're scanning a document) or Photo. ■ Quality: Select Standard (if you're scanning a document) or Graphics (if you're scanning a photo or picture). 5. Press OK. The photo is scanned and saved to the EPSCAN folder on your memory card. When scanning is finished, you see a confirmation screen. Note the name given to your image and its location on the card. Caution: Never open the scanner while scanning, or you may damage the RX580. Do not remove the card or turn off the RX580 while the memory card light is flashing, or you may lose data. If your RX580 is connected to a computer, make sure you follow the right steps to remove the card or turn off or disconnect the RX580. (See page 23.) Note: If the edges of the scan are cut off, move your original away from the corner slightly. 66 Scanning a Photo or Document
-
 1
1 -
2
-
3
-
4
-
5
-
6
-
7
-
8
-
9
-
10
-
11
-
12
-
13
-
14
-
15
-
16
-
17
-
18
-
19
-
20
-
21
-
22
-
23
-
24
-
25
-
26
-
27
-
28
-
29
-
30
-
31
-
32
-
33
-
34
-
35
-
36
-
37
-
38
-
39
-
40
-
41
-
42
-
43
-
44
-
45
-
46
-
47
-
48
-
49
-
50
-
51
-
52
-
53
-
54
-
55
-
56
-
57
-
58
-
59
-
60
-
 61
61 -
 62
62 -
 63
63 -
 64
64 -
 65
65 -
 66
66 -
 67
67 -
 68
68 -
 69
69 -
 70
70 -
 71
71 -
72
-
73
-
74
-
75
-
76
-
77
-
78
-
79
-
80
-
81
-
82
-
83
-
84
-
85
-
86
-
87
-
88
-
89
-
90
-
91
-
92
-
93
-
94
-
95
 |
 |