Epson Stylus Pro GS6000 Setup and User's Guide - Page 17
Setting Up the Printer, Unpacking and Assembling the Pro GS6000
 |
View all Epson Stylus Pro GS6000 manuals
Add to My Manuals
Save this manual to your list of manuals |
Page 17 highlights
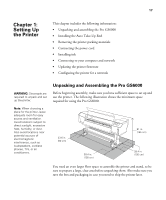
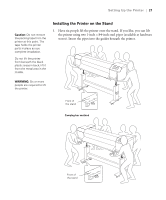
17 Chapter 1: Setting Up the Printer This chapter includes the following information: • Unpacking and assembling the Pro GS6000 • Installing the Auto Take-Up Reel • Removing the printer packing materials • Connecting the power cord • Installing ink • Connecting to your computer and network • Updating the printer firmware • Configuring the printer for a network WARNING: Six people are required to unpack and set up the printer. Note: When choosing a place for the printer, leave adequate room for easy access and ventilation. Avoid locations subject to direct sunlight, excessive heat, humidity, or dust. Also avoid locations near potential sources of electromagnetic interference, such as loudspeakers, cordless phones, TVs, or air conditioners. Unpacking and Assembling the Pro GS6000 Before beginning assembly, make sure you have sufficient space to set up and use the printer. The following illustration shows the minimum space required for using the Pro GS6000: 23.6 in. (60 cm) 39.4 in. (100 cm) 61 in. (155 cm) 39.4 in. (100 cm) You need an even larger floor space to assemble the printer and stand, so be sure to prepare a large, clear area before unpacking them. Also make sure you save the box and packaging in case you need to ship the printer later. 17
-
 1
1 -
2
-
3
-
4
-
5
-
6
-
7
-
8
-
9
-
10
-
11
-
 12
12 -
 13
13 -
 14
14 -
 15
15 -
 16
16 -
 17
17 -
 18
18 -
 19
19 -
 20
20 -
 21
21 -
 22
22 -
23
-
24
-
25
-
26
-
27
-
28
-
29
-
30
-
31
-
32
-
33
-
34
-
35
-
36
-
37
-
38
-
39
-
40
-
41
-
42
-
43
-
44
-
45
-
46
-
47
-
48
-
49
-
50
-
51
-
52
-
53
-
54
-
55
-
56
-
57
-
58
-
59
-
60
-
61
-
62
-
63
-
64
-
65
-
66
-
67
-
68
-
69
-
70
-
71
-
72
-
73
-
74
-
75
-
76
-
77
-
78
-
79
-
80
-
81
-
82
-
83
-
84
-
85
-
86
-
87
-
88
-
89
-
90
-
91
-
92
-
93
-
94
-
95
-
96
-
97
-
98
-
99
-
100
-
101
-
102
-
103
-
104
-
105
-
106
-
107
-
108
-
109
-
110
-
111
-
112
-
113
-
114
-
115
-
116
-
117
-
118
-
119
-
120
-
121
-
122
-
123
-
124
-
125
-
126
-
127
-
128
 |
 |
