Epson Stylus Pro GS6000 Setup and User's Guide - Page 73
Checking the Print Head Nozzles, Two patterns are printed; one for each print head.
 |
View all Epson Stylus Pro GS6000 manuals
Add to My Manuals
Save this manual to your list of manuals |
Page 73 highlights
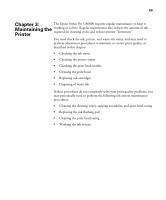
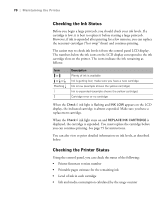
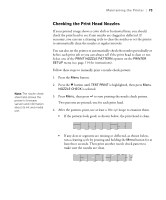
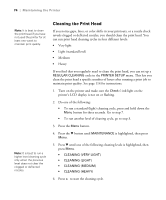
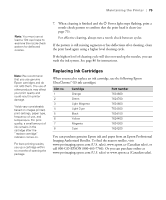
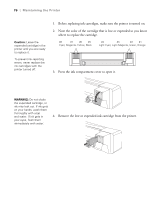
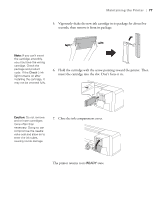
Maintaining the Printer | 73 Note: The nozzle check sheet also shows the printer's firmware version and information about its ink and media use. Checking the Print Head Nozzles If your printed image shows a color shift or horizontal lines, you should check the print head to see if any nozzles are clogged or deflected. If necessary, you can run a cleaning cycle to clear the nozzles or set the printer to automatically clean the nozzles at regular intervals. You can also set the printer to automatically check the nozzles periodically or before each print job so you can always tell if the print head is clean or not. Select one of the PRINT NOZZLE PATTERN options on the PRINTER SETUP menu (see page 114 for instructions). Follow these steps to manually print a nozzle check pattern: 1. Press the Menu button. 2. Press the d button until TEST PRINT is highlighted, then press Menu. NOZZLE CHECK is selected. 3. Press Menu, then press to start printing the nozzle check pattern. Two patterns are printed; one for each print head. 4. After the patterns print, use at least a 10× eye loupe to examine them. • If the patterns look good, as shown below, the print head is clean. • If any dots or segments are missing or deflected, as shown below, run a cleaning cycle by pressing and holding the Menu button for at least three seconds. Then print another nozzle check pattern to make sure the nozzles are clean. 73
-
 1
1 -
2
-
3
-
4
-
5
-
6
-
7
-
8
-
9
-
10
-
11
-
12
-
13
-
14
-
15
-
16
-
17
-
18
-
19
-
20
-
21
-
22
-
23
-
24
-
25
-
26
-
27
-
28
-
29
-
30
-
31
-
32
-
33
-
34
-
35
-
36
-
37
-
38
-
39
-
40
-
41
-
42
-
43
-
44
-
45
-
46
-
47
-
48
-
49
-
50
-
51
-
52
-
53
-
54
-
55
-
56
-
57
-
58
-
59
-
60
-
61
-
62
-
63
-
64
-
65
-
66
-
67
-
 68
68 -
 69
69 -
 70
70 -
 71
71 -
 72
72 -
 73
73 -
 74
74 -
 75
75 -
 76
76 -
 77
77 -
 78
78 -
79
-
80
-
81
-
82
-
83
-
84
-
85
-
86
-
87
-
88
-
89
-
90
-
91
-
92
-
93
-
94
-
95
-
96
-
97
-
98
-
99
-
100
-
101
-
102
-
103
-
104
-
105
-
106
-
107
-
108
-
109
-
110
-
111
-
112
-
113
-
114
-
115
-
116
-
117
-
118
-
119
-
120
-
121
-
122
-
123
-
124
-
125
-
126
-
127
-
128
 |
 |