Epson Stylus Pro GS6000 Setup and User's Guide - Page 55
When you finish printing on the affected media, return the head height
 |
View all Epson Stylus Pro GS6000 manuals
Add to My Manuals
Save this manual to your list of manuals |
Page 55 highlights
Handling Media and Printouts | 55 3. To raise the print head, flip the blue head height adjustment lever up to the position shown. The highest lever position is directly horizontal and the normal position is not quite vertical. Do not place the lever in any other position. Highest position Normal position 4. When you finish printing on the affected media, return the head height adjustment lever to the normal position. 5. Close the front cover. 55
-
 1
1 -
2
-
3
-
4
-
5
-
6
-
7
-
8
-
9
-
10
-
11
-
12
-
13
-
14
-
15
-
16
-
17
-
18
-
19
-
20
-
21
-
22
-
23
-
24
-
25
-
26
-
27
-
28
-
29
-
30
-
31
-
32
-
33
-
34
-
35
-
36
-
37
-
38
-
39
-
40
-
41
-
42
-
43
-
44
-
45
-
46
-
47
-
48
-
49
-
 50
50 -
 51
51 -
 52
52 -
 53
53 -
 54
54 -
 55
55 -
 56
56 -
 57
57 -
 58
58 -
 59
59 -
 60
60 -
61
-
62
-
63
-
64
-
65
-
66
-
67
-
68
-
69
-
70
-
71
-
72
-
73
-
74
-
75
-
76
-
77
-
78
-
79
-
80
-
81
-
82
-
83
-
84
-
85
-
86
-
87
-
88
-
89
-
90
-
91
-
92
-
93
-
94
-
95
-
96
-
97
-
98
-
99
-
100
-
101
-
102
-
103
-
104
-
105
-
106
-
107
-
108
-
109
-
110
-
111
-
112
-
113
-
114
-
115
-
116
-
117
-
118
-
119
-
120
-
121
-
122
-
123
-
124
-
125
-
126
-
127
-
128
 |
 |
55
Handling Media and Printouts
|
55
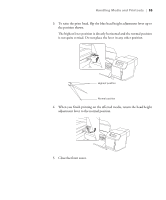
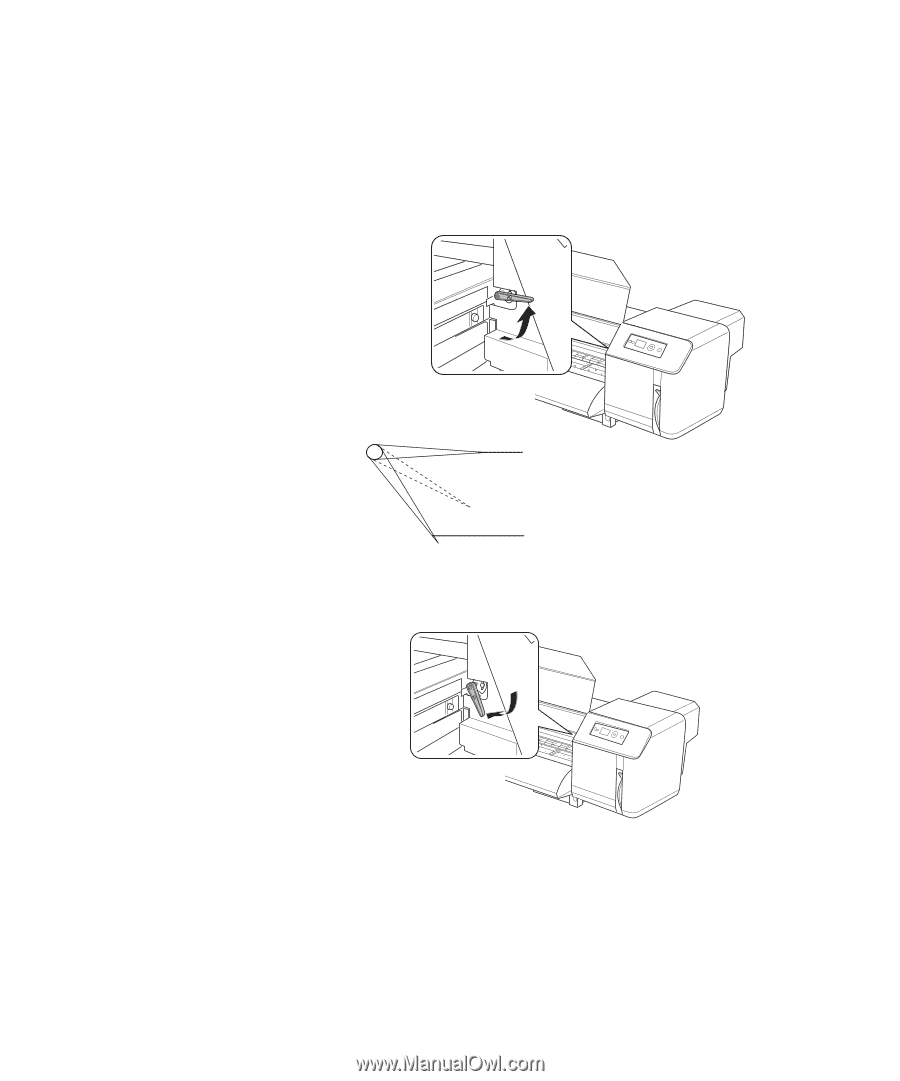
3.
To raise the print head, flip the blue head height adjustment lever up to
the position shown.
The highest lever position is directly horizontal and the normal position
is not quite vertical. Do not place the lever in any other position.
4.
When you finish printing on the affected media, return the head height
adjustment lever to the normal position.
5.
Close the front cover.
Highest position
Normal position