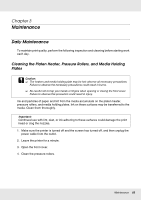
Epson SureColor S30670 User Manual - Page 85
Checking for clogged nozzles, Ways to Check for Clogs, Stop Printing, Continue Printing
 |
View all Epson SureColor S30670 manuals
Add to My Manuals
Save this manual to your list of manuals |
Page 85 highlights
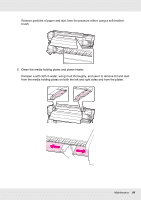
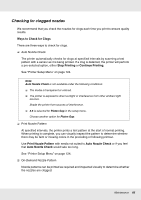
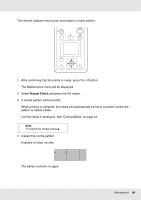
Checking for clogged nozzles We recommend that you check the nozzles for clogs each time you print to ensure quality results. Ways to Check for Clogs There are three ways to check for clogs. ❏ Auto Nozzle Check The printer automatically checks for clogs at specified intervals by scanning a test pattern with a sensor as it is being printed. If a clog is detected, the printer will perform a pre-selected option, either Stop Printing or Continue Printing. See "Printer Setup Menu" on page 124. Note: Auto Nozzle Check is not available under the following conditions: ❏ The media is transparent or colored. ❏ The printer is exposed to direct sunlight or interference from other ambient light sources. Shade the printer from sources of interference. ❏ 2.5 is selected for Platen Gap in the setup menu. Choose another option for Platen Gap. ❏ Print Nozzle Pattern At specified intervals, the printer prints a test pattern at the start of normal printing. When printing is complete, you can visually inspect the pattern to determine whether there may be faint or missing colors in the preceding or following printout. Use Print Nozzle Pattern with media not suited to Auto Nozzle Check or if you feel that Auto Nozzle Check would take too long. See "Printer Setup Menu" on page 124. ❏ On-Demand Nozzle Pattern Nozzle patterns can be printed as required and inspected visually to determine whether the nozzles are clogged. Maintenance 85
-
 1
1 -
2
-
3
-
4
-
5
-
6
-
7
-
8
-
9
-
10
-
11
-
12
-
13
-
14
-
15
-
16
-
17
-
18
-
19
-
20
-
21
-
22
-
23
-
24
-
25
-
26
-
27
-
28
-
29
-
30
-
31
-
32
-
33
-
34
-
35
-
36
-
37
-
38
-
39
-
40
-
41
-
42
-
43
-
44
-
45
-
46
-
47
-
48
-
49
-
50
-
51
-
52
-
53
-
54
-
55
-
56
-
57
-
58
-
59
-
60
-
61
-
62
-
63
-
64
-
65
-
66
-
67
-
68
-
69
-
70
-
71
-
72
-
73
-
74
-
75
-
76
-
77
-
78
-
79
-
 80
80 -
 81
81 -
 82
82 -
 83
83 -
 84
84 -
 85
85 -
 86
86 -
 87
87 -
 88
88 -
 89
89 -
 90
90 -
91
-
92
-
93
-
94
-
95
-
96
-
97
-
98
-
99
-
100
-
101
-
102
-
103
-
104
-
105
-
106
-
107
-
108
-
109
-
110
-
111
-
112
-
113
-
114
-
115
-
116
-
117
-
118
-
119
-
120
-
121
-
122
-
123
-
124
-
125
-
126
-
127
-
128
-
129
-
130
-
131
-
132
-
133
-
134
-
135
-
136
-
137
-
138
-
139
-
140
-
141
-
142
-
143
-
144
-
145
-
146
-
147
-
148
-
149
-
150
-
151
-
152
-
153
-
154
-
155
-
156
-
157
-
158
 |
 |