Epson SureColor S50670 Setup Guide - Page 12
Epson SureColor S50670 Manual
 |
View all Epson SureColor S50670 manuals
Add to My Manuals
Save this manual to your list of manuals |
Page 12 highlights
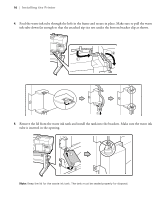
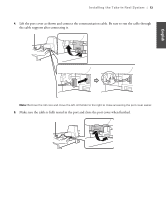
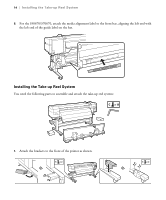
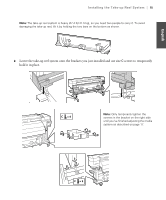
10 | Installing the Printer 4. Feed the waste ink tube through the hole in the frame and secure in place. Make sure to pull the waste ink tube down far enough so that the attached zip ties rest under the bottom bracket clip as shown. 5. Remove the lid from the waste ink tank and install the tank into the brackets. Make sure the waste ink tube is inserted in the opening. Note: Keep the lid for the waste ink tank. The tank must be sealed properly for disposal.
-
 1
1 -
2
-
3
-
4
-
5
-
6
-
 7
7 -
 8
8 -
 9
9 -
 10
10 -
 11
11 -
 12
12 -
 13
13 -
 14
14 -
 15
15 -
 16
16 -
 17
17 -
18
-
19
-
20
-
21
-
22
-
23
-
24
-
25
-
26
-
27
-
28
-
29
-
30
-
31
-
32
-
33
-
34
-
35
-
36
-
37
-
38
-
39
-
40
-
41
-
42
-
43
-
44
-
45
-
46
-
47
-
48
-
49
-
50
-
51
-
52
-
53
-
54
-
55
-
56
-
57
-
58
-
59
-
60
-
61
-
62
-
63
-
64
-
65
-
66
-
67
-
68
-
69
-
70
-
71
-
72
-
73
-
74
-
75
-
76
-
77
-
78
-
79
-
80
-
81
-
82
-
83
-
84
-
85
-
86
-
87
-
88
-
89
-
90
-
91
-
92
-
93
-
94
-
95
-
96
-
97
-
98
-
99
-
100
-
101
-
102
 |
 |
10
|
Installing the Printer
4.
Feed the waste ink tube through the hole in the frame and secure in place. Make sure to pull the waste
ink tube down far enough so that the attached zip ties rest under the bottom bracket clip as shown.
5.
Remove the lid from the waste ink tank and install the tank into the brackets. Make sure the waste ink
tube is inserted in the opening.
Note:
Keep the lid for the waste ink tank. The tank must be sealed properly for disposal.