Epson SureColor S50670 Setup Guide - Page 25
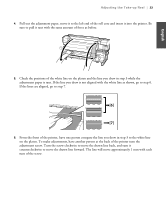
on the platen. To make adjustments, have another person at the back of the printer turn
 |
View all Epson SureColor S50670 manuals
Add to My Manuals
Save this manual to your list of manuals |
Page 25 highlights
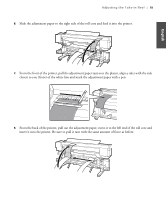
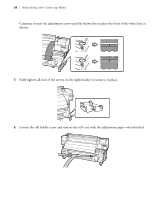
English Adjusting the Take-up Reel | 23 4. Pull out the adjustment paper, move it to the left end of the roll core and insert it into the printer. Be sure to pull it taut with the same amount of force as before. 5. Check the positions of the white line on the platen and the line you drew in step 3 while the adjustment paper is taut. If the line you drew is not aligned with the white line as shown, go to step 6. If the lines are aligned, go to step 7. 6. From the front of the printer, have one person compare the line you drew in step 3 to the white line on the platen. To make adjustments, have another person at the back of the printer turn the adjustment screw. Turn the screw clockwise to move the drawn line back, and turn it counterclockwise to move the drawn line forward. The line will move approximately 1 mm with each turn of the screw.
-
 1
1 -
2
-
3
-
4
-
5
-
6
-
7
-
8
-
9
-
10
-
11
-
12
-
13
-
14
-
15
-
16
-
17
-
18
-
19
-
 20
20 -
 21
21 -
 22
22 -
 23
23 -
 24
24 -
 25
25 -
 26
26 -
 27
27 -
 28
28 -
 29
29 -
 30
30 -
31
-
32
-
33
-
34
-
35
-
36
-
37
-
38
-
39
-
40
-
41
-
42
-
43
-
44
-
45
-
46
-
47
-
48
-
49
-
50
-
51
-
52
-
53
-
54
-
55
-
56
-
57
-
58
-
59
-
60
-
61
-
62
-
63
-
64
-
65
-
66
-
67
-
68
-
69
-
70
-
71
-
72
-
73
-
74
-
75
-
76
-
77
-
78
-
79
-
80
-
81
-
82
-
83
-
84
-
85
-
86
-
87
-
88
-
89
-
90
-
91
-
92
-
93
-
94
-
95
-
96
-
97
-
98
-
99
-
100
-
101
-
102
 |
 |