Epson T-1000 User Manual - Page 17
Fit the paper rest into the slots along the top edge of the back of
 |
View all Epson T-1000 manuals
Add to My Manuals
Save this manual to your list of manuals |
Page 17 highlights
Using Continuous-feed Paper 2. Pop out the tractor unit slot cover, which is located above the indicator lights. It may help to use the flat edge of a screwdriver, as shown on the next page. Store the cover in a safe place while you use the tractor unit, and replace it when you remove the tractor unit. 3. Fit the paper rest into the slots along the top edge of the back of the printer and snap it into place, as shown below. 1-10 Setting Up
-
 1
1 -
2
-
3
-
4
-
5
-
6
-
7
-
8
-
9
-
10
-
11
-
 12
12 -
 13
13 -
 14
14 -
 15
15 -
 16
16 -
 17
17 -
 18
18 -
 19
19 -
 20
20 -
 21
21 -
 22
22 -
23
-
24
-
25
-
26
-
27
-
28
-
29
-
30
-
31
-
32
-
33
-
34
-
35
-
36
-
37
-
38
-
39
-
40
-
41
-
42
-
43
-
44
-
45
-
46
-
47
-
48
-
49
-
50
-
51
-
52
-
53
-
54
-
55
-
56
-
57
-
58
-
59
-
60
-
61
-
62
-
63
-
64
-
65
-
66
-
67
-
68
-
69
-
70
-
71
-
72
-
73
-
74
-
75
-
76
-
77
-
78
-
79
-
80
-
81
-
82
-
83
-
84
-
85
-
86
-
87
-
88
-
89
-
90
-
91
-
92
-
93
-
94
 |
 |

Using Continuous-feed Paper
2.
Pop out the tractor unit slot cover, which is located above the
indicator lights. It may help to use the flat edge of a screwdriver, as
shown on the next page. Store the cover in a safe place while you use
the tractor unit, and replace it when you remove the tractor unit.
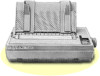
3.
Fit the paper rest into the slots along the top edge of the back of the
printer and snap it into place, as shown below.
1-10
Setting Up