Foxconn Quantumian1 User Manual - Page 104
Copy Create RAID in BIOS., Rapid Stor
 |
View all Foxconn Quantumian1 manuals
Add to My Manuals
Save this manual to your list of manuals |
Page 104 highlights
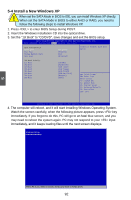
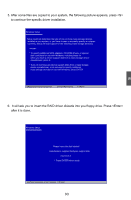
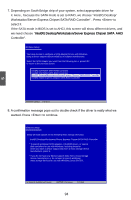
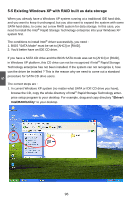
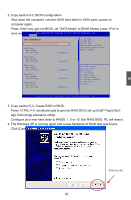
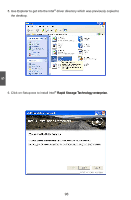
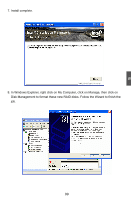
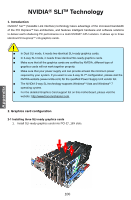
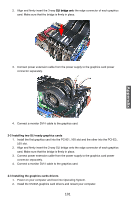
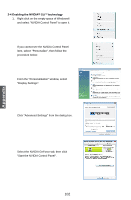
2. Copy section 5-2, BIOS Configuration. Shut down the computer, connect SATA hard disks to SATA ports, power on computer again. Press key, get into BIOS, set "SATA Mode" to [RAID Mode], press to save and exit BIOSAp.tPioCSetwupilUltrielibtyo - o C otp.yright (C) 2011 American Megatrends, Inc. Advanced �SA�T�A��C�o�n�f�i�g�u�r�a�t�i�o�n� SATA Mode SATA Port 0 Not Present Port Hot Plug SATA Port 1 Not Present Port Hot Plug SATA Port 2 Not Present Port Hot Plug SATA Port 3 Not Present Port Hot Plug SATA Port 4 Not Present Port Hot Plug [RAID Mode] [Disabled] [Disabled] [Disabled] [Disabled] [Disabled] (1) IDE Mode. (2) AHCI Mode. (3) RAID Mode. Enabled onboard SATA RAID option ROM if Launch Storage OpROM is enabled. → ← : Select Screen ↑ ↓ : Select Item Enter: Select +/-: Change Opt. F1: General Help F2: Previous Values F3: Optimized Defaults F4: Save & Exit ESC: Exit Version 2.14.1219. Copyright (C) 2011 American Megatrends, Inc. 3. Copy section 5-3, Create RAID in BIOS. Press simultaneously to get into RAID BIOS set up (Intel® Rapid Storage Technology enterprise utility). Configure your new hard disks to RAID0, 1, 5 or 10. Exit RAID BIOS. PC will reboot. 4. The Windows XP is running again and a new hardware of RAID disk was found. Click [Cancel] to skip this Wizard. 5 Click to exit. 97
-
 1
1 -
2
-
3
-
4
-
5
-
6
-
7
-
8
-
9
-
10
-
11
-
12
-
13
-
14
-
15
-
16
-
17
-
18
-
19
-
20
-
21
-
22
-
23
-
24
-
25
-
26
-
27
-
28
-
29
-
30
-
31
-
32
-
33
-
34
-
35
-
36
-
37
-
38
-
39
-
40
-
41
-
42
-
43
-
44
-
45
-
46
-
47
-
48
-
49
-
50
-
51
-
52
-
53
-
54
-
55
-
56
-
57
-
58
-
59
-
60
-
61
-
62
-
63
-
64
-
65
-
66
-
67
-
68
-
69
-
70
-
71
-
72
-
73
-
74
-
75
-
76
-
77
-
78
-
79
-
80
-
81
-
82
-
83
-
84
-
85
-
86
-
87
-
88
-
89
-
90
-
91
-
92
-
93
-
94
-
95
-
96
-
97
-
98
-
 99
99 -
 100
100 -
 101
101 -
 102
102 -
 103
103 -
 104
104 -
 105
105 -
 106
106 -
 107
107 -
 108
108 -
 109
109 -
110
-
111
-
112
 |
 |
