Fujitsu T4215 T4215 BIOS Guide - Page 26
Security Chip Setting Submenu of the Security Menu, Exiting from the Security Menu
 |
View all Fujitsu T4215 manuals
Add to My Manuals
Save this manual to your list of manuals |
Page 26 highlights
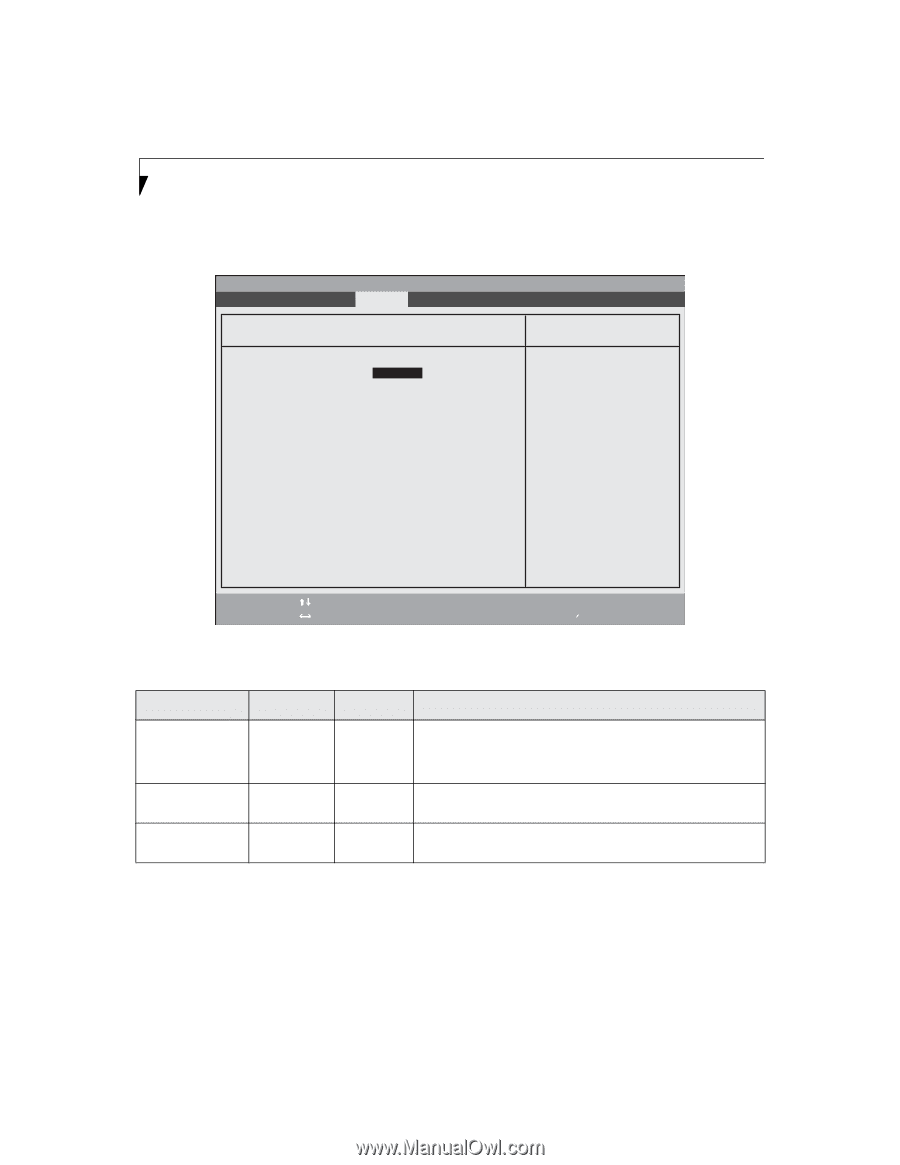
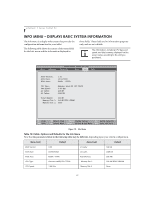
LifeBook T Series Tablet PC Security Chip Setting Submenu of the Security Menu The Security Chip Setting Submenu is for enabling or disabling the embedded security chip. PhoenixBIOS Setup Utility Main Advanced Security Power Savings Exit Security Chip Setting Item Specific Help Security Chip: [Enabled]] Clear Security Chip: [Enter] Security Chip State: Enabled Activated F1 Help ESC Exit Select Item -/Space Change Values F9 Setup Defaults ▲ Select Menu Enter Select Sub-Menu F10 Save and Exit Figure 16. Security Chip Setting Submenu Table 16: Fields, Options and Defaults for the Security Chip Setting Submenu of the Security Menu Menu Field Options Default Description Security Chip: ■ Disabled ■ Enabled Clear Security Chip -- Security Chip State: -- [Enabled] [Enter] -- Allows you to enable or disable the security chip. Note that this is only active if a Supervisor Password has been entered. A reboot is required after exit to configure the Security Chip correctly. Clear Security Chip option becomes selectable after reboot. This field is not selectable until after the security chip is enabled and the system is rebooted. Display only, to indicate the state of the chip if it has been enabled, disabled, activated or deactivated. Exiting from the Security Menu When you have finished setting the parameters on the Security Menu, you can either exit from setup utility or move to another menu. If you wish to exit from setup utility, press the [Esc] key to go to the Exit Menu. If you wish to move to another menu, use the cursor keys. 26
-
 1
1 -
2
-
3
-
4
-
5
-
6
-
7
-
8
-
9
-
10
-
11
-
12
-
13
-
14
-
15
-
16
-
17
-
18
-
19
-
20
-
 21
21 -
 22
22 -
 23
23 -
 24
24 -
 25
25 -
 26
26 -
 27
27 -
 28
28 -
 29
29 -
 30
30 -
 31
31 -
32
 |
 |