Garmin Alpha 200i Owners Manual - Page 17
Setting a Proximity Alarm
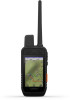 |
View all Garmin Alpha 200i manuals
Add to My Manuals
Save this manual to your list of manuals |
Page 17 highlights
Calibrating the Barometric Altimeter You can calibrate the barometric altimeter manually if you know the correct elevation or the correct barometric pressure. 1 Go to a location where the elevation or barometric pressure is known. 2 Select Track Manager > My Track > > > Altimeter Setup > Calibrate Altimeter. 3 Follow the on-screen instructions. Navigating to a Point on the Plot 1 Select Track Manager > My Track > . 2 Select an individual point on the plot. 3 Select > View Map. 4 Select Go. Changing the Plot Type You can change the elevation plot to display pressure and elevation over time or distance. 1 Select Track Manager > My Track > > > Altimeter Setup > Plot Type. 2 Select an option. Resetting the Elevation Plot Select Track Manager > My Track > > > Reset. Trip Computer The trip computer displays your current speed, average speed, maximum speed, trip odometer, and other helpful statistics. You can customize the trip computer layout, dashboard, and data fields (Customizing the Trip Computer Data Fields, page 13). To open the trip computer, select Trip Computer. Customizing the Trip Computer Data Fields 1 Select Navigation > Trip Computer. 2 Select a data field to customize. 3 Select a category or select All Categories. 4 Select the new data field. For data field descriptions, see (Data Field Options, page 19). Resetting the Trip Computer For more accurate trip information, reset the trip computer before beginning a trip. Select Navigation > Trip Computer > > Reset Trip. Applications Additional device features can be found in the applications. You can customize the main menu to display additional applications (Customizing the Main Menu, page 14). Setting a Proximity Alarm Proximity alarms alert you when you or your dogs are within a specified range of a particular location. A tone sounds when you enter the designated radius. 1 Select Proximity Alarms. 2 Select Create Alarm. 3 Select a category. 4 Select a location. 5 Select Use. 6 Enter a radius. When you enter an area with a proximity alarm, the device sounds a tone. Calculating the Size of an Area 1 Select Area Calculation > Start. 2 Walk around the perimeter of the area you want to calculate. 3 When finished, select Calculate. Setting an Alarm 1 Select Alarm Clock. 2 Select and to set the time. 3 Select Turn Alarm On. The alarm sounds at the selected time. If the device is off at the alarm time, the device turns on and sounds the alarm. Using the Competition Timer 1 Select Competition Timer. 2 Select an option: • Select to start and pause the competition timer. • Select to reset the competition timer. • Select to set the competition timer duration and alerts. • Select from the list to create a customized timer that counts up from zero. Satellite Page The satellite page shows your current location, GPS accuracy, satellite locations, and signal strength. Changing the Satellite View By default, the satellite view is with North at the top. You can change the view of the satellites to be oriented with your current track toward the top of the screen. Select Satellite > > Track Up. Turning Off GPS Select Satellite > > Satellite Setup > Demo Mode. Simulating a Location 1 Select Satellite > > Demo Mode. 2 Select > Set Location On Map. 3 Select a location. 4 Select Use. Downloading BirdsEye Imagery Before you can download BirdsEye imagery directly to your device, you must connect to a wireless network (Connecting to a Wireless Network, page 9). 1 Select BirdsEye Direct > Download Imagery. 2 Select an option: • To download BirdsEye imagery files for a specific location or area, select Location, and select a category. NOTE: The location defaults to your current location. • To edit the name of the downloaded imagery files, select Name. • To select an image quality option, select Detail. • To define the size of the area to be shown in the downloaded imagery files, select Radius, and enter a distance from the selected location. An estimated file size appears for the selected image quality and radius. You should verify your device has enough available storage space for the imagery file. 3 Select Download. Applications 13
-
 1
1 -
2
-
3
-
4
-
5
-
6
-
7
-
8
-
9
-
10
-
11
-
 12
12 -
 13
13 -
 14
14 -
 15
15 -
 16
16 -
 17
17 -
 18
18 -
 19
19 -
 20
20 -
 21
21 -
 22
22 -
23
-
24
-
25
-
26
-
27
-
28
 |
 |
