Garmin Alpha 200i Owners Manual - Page 6
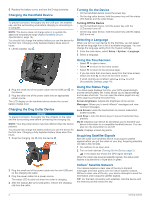
Charging the Dog Collar Device
 |
View all Garmin Alpha 200i manuals
Add to My Manuals
Save this manual to your list of manuals |
Page 6 highlights
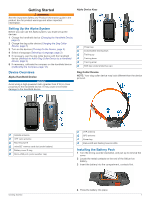
5 Replace the battery cover, and turn the D-ring clockwise. Charging the Handheld Device NOTICE To prevent corrosion, thoroughly dry the USB port, the weather cap, and the surrounding area before charging or connecting to a computer. NOTE: The device does not charge when it is outside the approved temperature range (Alpha Handheld Device Specifications, page 15). You should fully charge the battery before you use the device for the first time. Charging a fully depleted battery takes about 4 hours. 1 Lift the weather cap . Turning On the Device • On the handheld device, press the power key. • On the dog collar device, hold the power key until the status LED flashes and the collar beeps. Turning Off the Device • On the handheld device, hold the power key until the LCD screen turns off. • On the dog collar device, hold the power key until the status LED turns red. Selecting a Language When you turn on your device for the first time, you will select the device language from a list of available languages. You can change the language setting from the System settings. 1 From the main menu, select Setup > System > Language. 2 Select a language. Using the Touchscreen • Select to open a menu. • Select to return to the home screen. • Select to return to the previous page. • If you are more than one menu away from the home screen, select and hold to return to the home screen. • If scroll controls are enabled, select and to scroll (Accessibility Settings, page 14). 2 Plug the small end of the power cable into the USB port on the device. 3 Plug the other end of the power cable into an appropriate power source. The LCD display on the handheld device shows the current battery charge level. Charging the Dog Collar Device NOTICE To prevent corrosion, thoroughly dry the contacts on the collar and the surrounding area before connecting the charging clip. NOTE: Your dog collar device may look different than the device pictured. You should fully charge the battery before you use the device for the first time. Charging a fully depleted battery takes about five hours. 1 Snap the charging clip onto the device . Using the Status Page The status page displays the time, your GPS signal strength, and the device battery life. It also allows you to adjust settings and access shortcuts. You can open the status page from any other page by pressing the power key. Screen brightness: Adjusts the brightness of the screen. Messages: Allows you to send inReach® messages and view received messages. Lock Screen: Locks the touchscreen to prevent inadvertent screen touches. Lock Keys: Locks the device keys to prevent inadvertent key presses. My ID: Displays your device ID and allows you to transmit your device information to a compatible handheld device. You can also turn the transmitter on and off. Alerts: Displays unread dog alerts. Acquiring Satellite Signals Both the collar and handheld device must acquire satellite signals before you put the collar on your dog. Acquiring satellites can take a few minutes. 1 Go outdoors to an open area. 2 Turn on both devices (Turning On the Device, page 2). in the status bar shows the GPS signal strength. When the collar has acquired satellite signals, the status LED flashes a double-blink or triple-blink in green. 2 Plug the small end of the power cable into the mini-USB port on the charging clip cable. 3 Plug the power cable into a power source. The status LED is solid red when the collar is charging. 4 After the status LED turns solid green, remove the charging clip from the collar. Iridium® Satellite Network Your device requires a clear view of the sky to transmit messages and track points over the Iridium satellite network. Without a clear view of the sky, your device attempts to send the information until it acquires satellite signals. TIP: For the best connection with satellites, hold the device with the antenna pointed toward the sky. 2 Getting Started
-
 1
1 -
 2
2 -
 3
3 -
 4
4 -
 5
5 -
 6
6 -
 7
7 -
 8
8 -
 9
9 -
 10
10 -
 11
11 -
 12
12 -
13
-
14
-
15
-
16
-
17
-
18
-
19
-
20
-
21
-
22
-
23
-
24
-
25
-
26
-
27
-
28
 |
 |
