Garmin Catalyst Driving Performance Optimizer Owners Manual - Page 5
Getting Started, Installation
 |
View all Garmin Catalyst Driving Performance Optimizer manuals
Add to My Manuals
Save this manual to your list of manuals |
Page 5 highlights
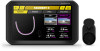
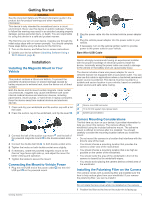
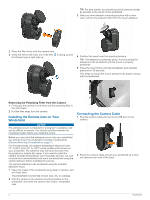
Getting Started WARNING See the Important Safety and Product Information guide in the product box for product warnings and other important information. This device is only intended for recreational use in a circuit environment. Never use this device on public roadways. Failure to follow this warning may result in an accident causing property damage, serious personal injury, or death. You are responsible for using this device in a safe and prudent manner. The first time you turn on your device, it guides you through the initial setup steps with on-screen prompts. You should complete these steps before using the device for the first time. 1 Turn on the device, and follow the on-screen instructions. 2 Update your device software (Updating Software Using a Wi‑Fi Network, page 8). Installation Installing the Magnetic Mount in Your Vehicle WARNING This product contains a lithium-ion battery. To prevent the possibility of personal injury or product damage caused by battery exposure to extreme heat, store the device out of direct sunlight. Both the device and its mount contain magnets. Under certain circumstances, magnets may cause interference with some internal medical devices and electronic devices, including pacemakers, insulin pumps, or hard drives in laptop computers. Keep the device away from medical devices and electronic devices. 1 Clean and dry your windshield and the suction cup with a lintfree cloth. 2 Press the suction cup to the windshield, and flip the lever . 2 Plug the power cable into the included vehicle power adapter . 3 Plug the vehicle power adapter into the power outlet in your vehicle. 4 If necessary, turn on the vehicle ignition switch to provide power to the power outlet in your vehicle. Bare Wire USB Cable WARNING Garmin strongly recommends having an experienced installer with the proper knowledge of electrical systems install the device. Incorrectly wiring the power cable can result in damage to the vehicle or the battery and can cause bodily injury. The device includes a bare wire power adapter for use in vehicles that are not equipped with a CLA power outlet. You can also use this cable in applications where a hardwired permanent power source is preferred. The device must be mounted in a suitable and secure location in your vehicle, based on available power sources and safe cable routing. Device mini-USB connector 10 to 30 Vdc system input power (red) System ground (black) 3 Connect the ball of the suction cup mount and the ball of the powered magnetic mount to the double-socket arms . 4 Connect the double-ball link to both double-socket arms. 5 Tighten the knobs on both double-socket arms slightly. 6 If necessary, rotate the powered magnetic mount so the Garmin® logo faces right-side up, and adjust the mount for better viewing and operation. 7 Tighten the knobs to secure the mount. Connecting the Mount to Vehicle Power 1 Plug the mini-USB end of the power cable into the miniUSB port on the powered mount. Camera Mounting Considerations The first time you turn on your device, it provides information to help you mount the camera. The camera affixes to the windshield using the included adhesive mount. The adhesive mount is difficult to remove after it is installed. You should carefully consider the mounting location before you install the mount. • Do not mount the camera in a location that interferes with the driver's view of the road. • You should choose a mounting location that provides the camera a clear view of the road ahead. • You should choose a mounting location that is as high as possible on the center of the windshield. • You should verify the area of the windshield in front of the camera is cleared by the windshield wipers. • You should avoid placing the camera behind a tinted area of the windshield. Installing the Polarizing Filter on the Camera The camera comes with a polarizing filter pre-installed over the lens to help reduce glare from your windshield. If you remove the polarizing filter, you can re-install it. NOTICE Do not rotate the lens cover while it is installed on the camera. 1 Position the filter so the line on the outer rim is facing up. Getting Started 1
-
 1
1 -
 2
2 -
 3
3 -
 4
4 -
 5
5 -
 6
6 -
 7
7 -
 8
8 -
 9
9 -
 10
10 -
 11
11 -
12
-
13
-
14
-
15
-
16
-
17
-
18
 |
 |
